# GLM-4.7-Flash:如何本地运行
GLM-4.7-Flash 是 Z.ai 全新的 30B MoE 推理模型,专为本地部署打造,在编码、智能体工作流和聊天方面提供同类最佳性能。它仅使用约 3.6B 参数,支持 200K 上下文,并在 SWE-Bench、GPQA 以及推理/聊天基准测试中领先。
GLM-4.7-Flash 可运行于 **24GB RAM**/VRAM/统一内存(完整精度需 32GB),现在你也可以使用 Unsloth 进行微调。要通过 vLLM 运行 GLM 4.7 Flash,请参见 [#glm-4.7-flash-in-vllm](#glm-4.7-flash-in-vllm "mention")
{% hint style="success" %}
1 月 21 日更新: `llama.cpp` 修复了一个指定错误的 bug `scoring_func`: `"softmax"` (应为 `"sigmoid"`)。这会导致循环和糟糕的输出。我们已更新 GGUF 文件——请重新下载模型以获得更好的输出。
你现在可以使用 Z.ai 推荐的参数并获得很好的结果:
* **对于通用场景:** `--temp 1.0 --top-p 0.95`
* **对于工具调用:** `--temp 0.7 --top-p 1.0`
* **重复惩罚:** 禁用它,或设置 `--repeat-penalty 1.0`
1 月 22 日:更快的推理已上线,因为 CUDA 的 FA 修复已合并。
{% endhint %}
运行教程微调
要运行的 GLM-4.7-Flash GGUF: [unsloth/GLM-4.7-Flash-GGUF](https://huggingface.co/unsloth/GLM-4.7-Flash-GGUF)
### ⚙️ 使用指南
为了获得最佳性能,请确保你的可用总内存(VRAM + 系统 RAM)超过你正在下载的量化模型文件大小。如果不够,llama.cpp 仍可通过 SSD/HDD 卸载运行,但推理会更慢。
在与 Z.ai 团队沟通后,他们建议使用其 GLM-4.7 采样参数:
| 默认设置(大多数任务) | Terminal Bench、SWE Bench Verified |
| ------------------------------------------------------------------ | ------------------------------------------------------------------ |
| **temperature = 1.0** | **temperature = 0.7** |
| **top\_p = 0.95** | **top\_p = 1.0** |
| repeat penalty = disabled or 1.0 | repeat penalty = disabled or 1.0 |
* 对于通用场景: `--temp 1.0 --top-p 0.95`
* 对于工具调用: `--temp 0.7 --top-p 1.0`
* 如果使用 llama.cpp,请设置 `--min-p 0.01` 因为 llama.cpp 的默认值是 0.05
* 有时你需要试验哪些数值最适合你的使用场景。
{% hint style="warning" %}
目前,我们 **不建议** 使用 **Ollama** 运行此 GGUF,因为可能存在聊天模板兼容性问题。该 GGUF 在 llama.cpp(或如 LM Studio、Jan 等后端)上运行良好。
**记得关闭重复惩罚!或者设置** `--repeat-penalty 1.0`
{% endhint %}
* **最大上下文窗口:** `202,752`
### 🖥️ 运行 GLM-4.7-Flash
根据你的使用场景,你需要使用不同的设置。由于模型架构(如 [gpt-oss](https://unsloth.ai/docs/zh/mo-xing/gpt-oss-how-to-run-and-fine-tune))的某些维度不能被 128 整除,因此某些部分无法量化到更低位。
因为本指南使用 4 位,你将需要大约 18GB RAM/统一内存。我们建议至少使用 4 位精度以获得最佳性能。
{% hint style="warning" %}
目前,我们 **不建议** 使用 **Ollama** 运行此 GGUF,因为可能存在聊天模板兼容性问题。该 GGUF 在 llama.cpp(或如 LM Studio、Jan 等后端)上运行良好。
**记得关闭重复惩罚!或者设置** `--repeat-penalty 1.0`
{% endhint %}
#### 🦥 Unsloth Studio 指南
GLM-4.7-Flash 可以运行并微调于 [Unsloth Studio](https://unsloth.ai/docs/zh/xin-zeng/studio)中运行和微调,这是我们新推出的本地 AI 开源 Web UI。使用 Unsloth Studio,你可以在以下平台本地运行模型: **MacOS、Windows**、Linux,以及:
{% columns %}
{% column %}
* 搜索、下载、 [运行 GGUF](https://unsloth.ai/docs/zh/xin-zeng/studio#run-models-locally) 和 safetensor 模型
* [**自我修复** 工具调用](https://unsloth.ai/docs/zh/xin-zeng/studio#execute-code--heal-tool-calling) + **网页搜索**
* [**代码执行**](https://unsloth.ai/docs/zh/xin-zeng/studio#run-models-locally) (Python、Bash)
* [自动推理](https://unsloth.ai/docs/zh/xin-zeng/studio#model-arena) 参数调优(temp、top-p 等)
* 通过 llama.cpp 实现快速 CPU + GPU 推理
* [训练 LLM](https://unsloth.ai/docs/zh/xin-zeng/studio#no-code-training) 速度提升 2 倍,VRAM 减少 70%
{% endcolumn %}
{% column %}
{% endcolumn %}
{% endcolumns %}
{% stepper %}
{% step %}
**安装 Unsloth**
在你的终端中运行:
MacOS、Linux、WSL:
```bash
curl -fsSL https://unsloth.ai/install.sh | sh
```
Windows PowerShell:
```bash
irm https://unsloth.ai/install.ps1 | iex
```
{% hint style="success" %}
**安装会很快,约需 1-2 分钟。**
{% endhint %}
{% endstep %}
{% step %}
**启动 Unsloth**
MacOS、Linux、WSL 和 Windows:
```bash
unsloth studio -H 0.0.0.0 -p 8888
```
然后打开 `http://localhost:8888` 在你的浏览器中。
{% endstep %}
{% step %}
**搜索并下载 GLM-4.7-Flash**
首次启动时,你需要创建密码以保护你的账户,并在之后重新登录。随后你会看到一个简短的新手引导向导,用于选择模型、数据集和基本设置。你可以随时跳过它。
然后前往 [Studio Chat](https://unsloth.ai/docs/zh/xin-zeng/studio/chat) 标签页并搜索 **GLM-4.7-Flash** 在搜索栏中输入,并下载你想要的模型和量化版本。
{% endstep %}
{% step %}
**运行 GLM-4.7-Flash**
使用 Unsloth Studio 时,推理参数应会自动设置,不过你仍然可以手动更改。你也可以编辑上下文长度、聊天模板和其他设置。
更多信息,请查看我们的 [Unsloth Studio 推理指南](https://unsloth.ai/docs/zh/xin-zeng/studio/chat).
{% endstep %}
{% endstepper %}
#### Llama.cpp 教程(GGUF):
在 llama.cpp 中运行的说明(注意我们将使用 4 位以适配大多数设备):
{% stepper %}
{% step %}
获取最新的 `llama.cpp` 在 [GitHub 这里](https://github.com/ggml-org/llama.cpp)。你也可以按照下面的构建说明进行操作。把 `-DGGML_CUDA=ON` 改为 `-DGGML_CUDA=OFF` 如果你没有 GPU,或者只是想进行 CPU 推理。 **对于 Apple Mac / Metal 设备**,设置 `-DGGML_CUDA=OFF` ,然后照常继续——Metal 支持默认开启。
{% code overflow="wrap" %}
```bash
apt-get update
apt-get install pciutils build-essential cmake curl libcurl4-openssl-dev -y
git clone https://github.com/ggml-org/llama.cpp
cmake llama.cpp -B llama.cpp/build \
-DBUILD_SHARED_LIBS=OFF -DGGML_CUDA=ON
cmake --build llama.cpp/build --config Release -j --clean-first --target llama-cli llama-mtmd-cli llama-server llama-gguf-split
cp llama.cpp/build/bin/llama-* llama.cpp
```
{% endcode %}
{% endstep %}
{% step %}
你可以直接从 Hugging Face 拉取。随着你的 RAM/VRAM 允许,你可以将上下文增加到 200K。
你也可以尝试 Z.ai 推荐的 GLM-4.7 采样参数:
* 对于通用场景: `--temp 1.0 --top-p 0.95`
* 对于工具调用: `--temp 0.7 --top-p 1.0`
* **记得关闭重复惩罚!**
按以下方式用于 **通用指令** 用例:
```bash
./llama.cpp/llama-cli \
-hf unsloth/GLM-4.7-Flash-GGUF:UD-Q4_K_XL \\
--ctx-size 16384 \
--temp 1.0 --top-p 0.95 --min-p 0.01
```
按以下方式用于 **工具调用** 用例:
```bash
./llama.cpp/llama-cli \
-hf unsloth/GLM-4.7-Flash-GGUF:UD-Q4_K_XL \\
--ctx-size 16384 \
--temp 0.7 --top-p 1.0 --min-p 0.01
```
{% endstep %}
{% step %}
通过以下方式下载模型(在安装后 `pip install huggingface_hub`)。你可以选择 `UD-Q4_K_XL` 或其他量化版本。如果下载卡住,请参见 [hugging-face-hub-xet-debugging](https://unsloth.ai/docs/zh/ji-chu/troubleshooting-and-faqs/hugging-face-hub-xet-debugging "mention")
{% code overflow="wrap" %}
```bash
pip install -U huggingface_hub
hf download unsloth/GLM-4.7-Flash-GGUF \\
--local-dir unsloth/GLM-4.7-Flash-GGUF \\
--include "*UD-Q2_K_XL*"
```
{% endcode %}
{% endstep %}
{% step %}
然后以对话模式运行模型:
{% code overflow="wrap" %}
```bash
./llama.cpp/llama-cli \
--model unsloth/GLM-4.7-Flash-GGUF/GLM-4.7-Flash-UD-Q4_K_XL.gguf \\
--ctx-size 16384 \
--seed 3407 \
--temp 1.0 \
--top-p 0.95 \
--min-p 0.01
```
{% endcode %}
另外,按需调整 **上下文窗口** 按需,最多到 `202752`
{% endstep %}
{% endstepper %}
### :loop:减少重复和循环
{% hint style="success" %}
**1 月 21 日更新:llama.cpp 修复了一个指定错误的 bug** `"scoring_func": "softmax"` **它会导致循环和糟糕的输出(应为 sigmoid)我们已更新 GGUF 文件。请重新下载模型以获得更好的输出。**
{% endhint %}
这意味着你现在可以使用 Z.ai 推荐的参数并获得很好的结果:
* 对于通用场景: `--temp 1.0 --top-p 0.95`
* 对于工具调用: `--temp 0.7 --top-p 1.0`
* 如果使用 llama.cpp,请设置 `--min-p 0.01` 因为 llama.cpp 的默认值是 0.05
* **记得关闭重复惩罚!或者设置** `--repeat-penalty 1.0`
我们添加了 `"scoring_func": "sigmoid"` 改为 `config.json` 用于主模型 - [见](https://huggingface.co/unsloth/GLM-4.7-Flash/commit/3fd53b491e04f707f307aef2f70f8a7520511e6d).
{% hint style="warning" %}
目前,我们 **不建议** 使用 **Ollama** 运行此 GGUF,因为可能存在聊天模板兼容性问题。该 GGUF 在 llama.cpp(或如 LM Studio、Jan 等后端)上运行良好。
{% endhint %}
### :bird:使用 UD-Q4\_K\_XL 的 Flappy Bird 示例
作为示例,我们通过以下方式使用 UD-Q4\_K\_XL 完成了一段很长的对话: `./llama.cpp/llama-cli --model unsloth/GLM-4.7-Flash-GGUF/GLM-4.7-Flash-UD-Q4_K_XL.gguf --fit on --temp 1.0 --top-p 0.95 --min-p 0.01` :
```
你好
2+2 等于多少
创建一个 Python Flappy Bird 游戏
用 Rust 创建一个完全不同的游戏
找出两者中的 bug
把我刚才提到的第一个游戏做成一个独立的 HTML 文件
找出 bug 并展示修复后的游戏
```
这会在 HTML 形式下渲染出以下 Flappy Bird 游戏:
HTML 中的 Flappy Bird 游戏(可展开)
```html
Flappy Bird Fixed
```
而且我们还截取了一些截图(4bit 可用):


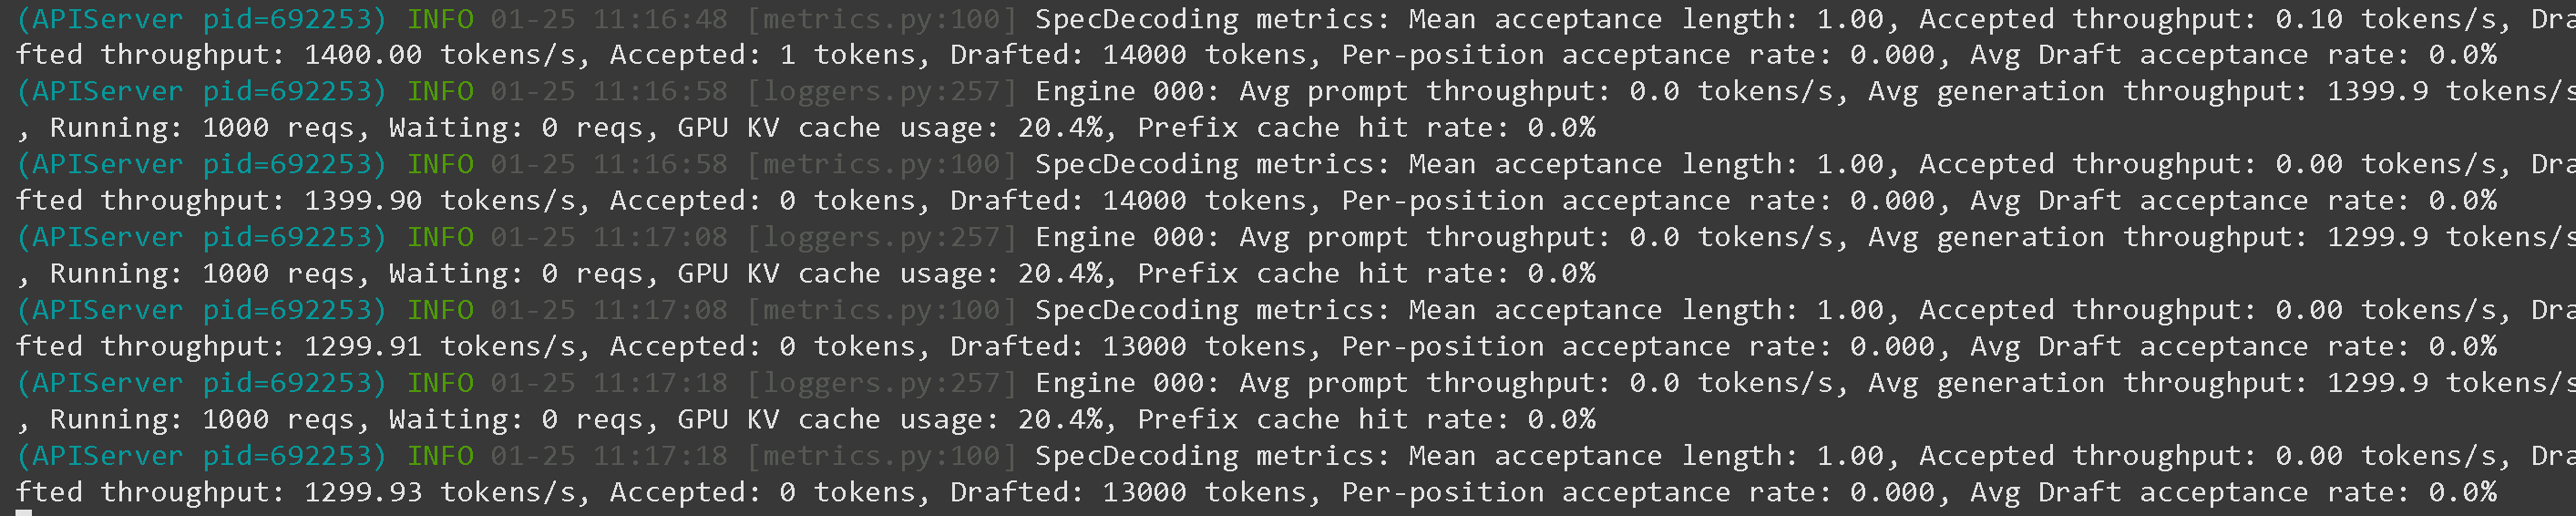 以及在 1xB200 上 13,000 tokens/s 吞吐量(每个用户仍为 130 token/s 解码)
 ### :hammer:使用 GLM-4.7-Flash 进行工具调用
见 [tool-calling-guide-for-local-llms](https://unsloth.ai/docs/zh/ji-chu/tool-calling-guide-for-local-llms "mention") 以了解如何进行工具调用的更多细节。在一个新终端中(如果使用 tmux,请使用 CTRL+B+D),我们创建一些工具,例如添加两个数字、执行 Python 代码、执行 Linux 函数,以及更多:
{% code expandable="true" %}
```python
import json, subprocess, random
from typing import Any
def add_number(a: float | str, b: float | str) -> float:
return float(a) + float(b)
def multiply_number(a: float | str, b: float | str) -> float:
return float(a) * float(b)
def substract_number(a: float | str, b: float | str) -> float:
return float(a) - float(b)
def write_a_story() -> str:
return random.choice([
"很久很久以前,在一个遥远的银河系里……",
"有两个朋友,他们热爱树懒和代码……",
"世界即将终结,因为每只树懒都进化出了超人般的智慧……",
"一位朋友并不知道,另一位朋友不小心写了一个让树懒进化的程序……",
])
def terminal(command: str) -> str:
if "rm" in command or "sudo" in command or "dd" in command or "chmod" in command:
msg = "Cannot execute 'rm, sudo, dd, chmod' commands since they are dangerous"
print(msg); return msg
print(f"Executing terminal command `{command}`")
try:
return str(subprocess.run(command, capture_output = True, text = True, shell = True, check = True).stdout)
except subprocess.CalledProcessError as e:
return f"Command failed: {e.stderr}"
def python(code: str) -> str:
data = {}
exec(code, data)
del data["__builtins__"]
return str(data)
MAP_FN = {
"add_number": add_number,
"multiply_number": multiply_number,
"substract_number": substract_number,
"write_a_story": write_a_story,
"terminal": terminal,
"python": python,
}
tools = [
{
"type": "function",
"function": {
"name": "add_number",
"description": "添加两个数字。",
"parameters": {
"type": "object",
"properties": {
"a": {
"type": "string",
"description": "第一个数字。",
},
"b": {
"type": "string",
"description": "第二个数字。",
},
},
"required": ["a", "b"],
},
},
},
{
"type": "function",
"function": {
"name": "multiply_number",
"description": "将两个数字相乘。",
"parameters": {
"type": "object",
"properties": {
"a": {
"type": "string",
"description": "第一个数字。",
},
"b": {
"type": "string",
"description": "第二个数字。",
},
},
"required": ["a", "b"],
},
},
},
{
"type": "function",
"function": {
"name": "substract_number",
"description": "将两个数字相减。",
"parameters": {
"type": "object",
"properties": {
"a": {
"type": "string",
"description": "第一个数字。",
},
"b": {
"type": "string",
"description": "第二个数字。",
},
},
"required": ["a", "b"],
},
},
},
{
"type": "function",
"function": {
"name": "write_a_story",
"description": "写一个随机故事。",
"parameters": {
"type": "object",
"properties": {},
"required": [],
},
},
},
{
"type": "function",
"function": {
"name": "terminal",
"description": "在终端执行操作。",
"parameters": {
"type": "object",
"properties": {
"command": {
"type": "string",
"description": "您希望启动的命令,例如 `ls`、`rm` 等。",
},
},
"required": ["command"],
},
},
},
{
"type": "function",
"function": {
"name": "python",
"description": "调用 Python 解释器并运行一些 Python 代码。",
"parameters": {
"type": "object",
"properties": {
"code": {
"type": "string",
"description": "要运行的 Python 代码",
},
},
"required": ["code"],
},
},
},
]
```
{% endcode %}
然后我们使用下面的函数(复制并粘贴后执行),它们会自动解析函数调用,并为任何模型调用 OpenAI 端点:
{% code overflow="wrap" expandable="true" %}
```python
from openai import OpenAI
def unsloth_inference(
messages,
temperature = 0.7,
top_p = 1.0,
top_k = -1,
repetition_penalty = 0.0,
):
messages = messages.copy()
openai_client = OpenAI(
base_url = "http://127.0.0.1:8001/v1",
api_key = "sk-no-key-required",
)
model_name = next(iter(openai_client.models.list())).id
print(f"Using model = {model_name}")
has_tool_calls = True
original_messages_len = len(messages)
while has_tool_calls:
print(f"Current messages = {messages}")
response = openai_client.chat.completions.create(
model = model_name,
messages = messages,
temperature = temperature,
top_p = top_p,
tools = tools if tools else None,
tool_choice = "auto" if tools else None,
extra_body = {"top_k": top_k, "min_p": min_p, "dry_multiplier" :repetition_penalty,}
)
tool_calls = response.choices[0].message.tool_calls or []
content = response.choices[0].message.content or ""
tool_calls_dict = [tc.to_dict() for tc in tool_calls] if tool_calls else tool_calls
messages.append({"role": "assistant", "tool_calls": tool_calls_dict, "content": content,})
for tool_call in tool_calls:
fx, args, _id = tool_call.function.name, tool_call.function.arguments, tool_call.id
out = MAP_FN[fx](**json.loads(args))
messages.append({"role": "tool", "tool_call_id": _id, "name": fx, "content": str(out),})
else:
has_tool_calls = False
return messages
```
{% endcode %}
在通过以下方式启动 GLM-4.7-Flash 之后 `llama-server` 像在 [#deploy-with-llama-server-and-openais-completion-library](#deploy-with-llama-server-and-openais-completion-library "mention") 或参见 [tool-calling-guide-for-local-llms](https://unsloth.ai/docs/zh/ji-chu/tool-calling-guide-for-local-llms "mention") 了解更多详情后,我们就可以进行一些工具调用:
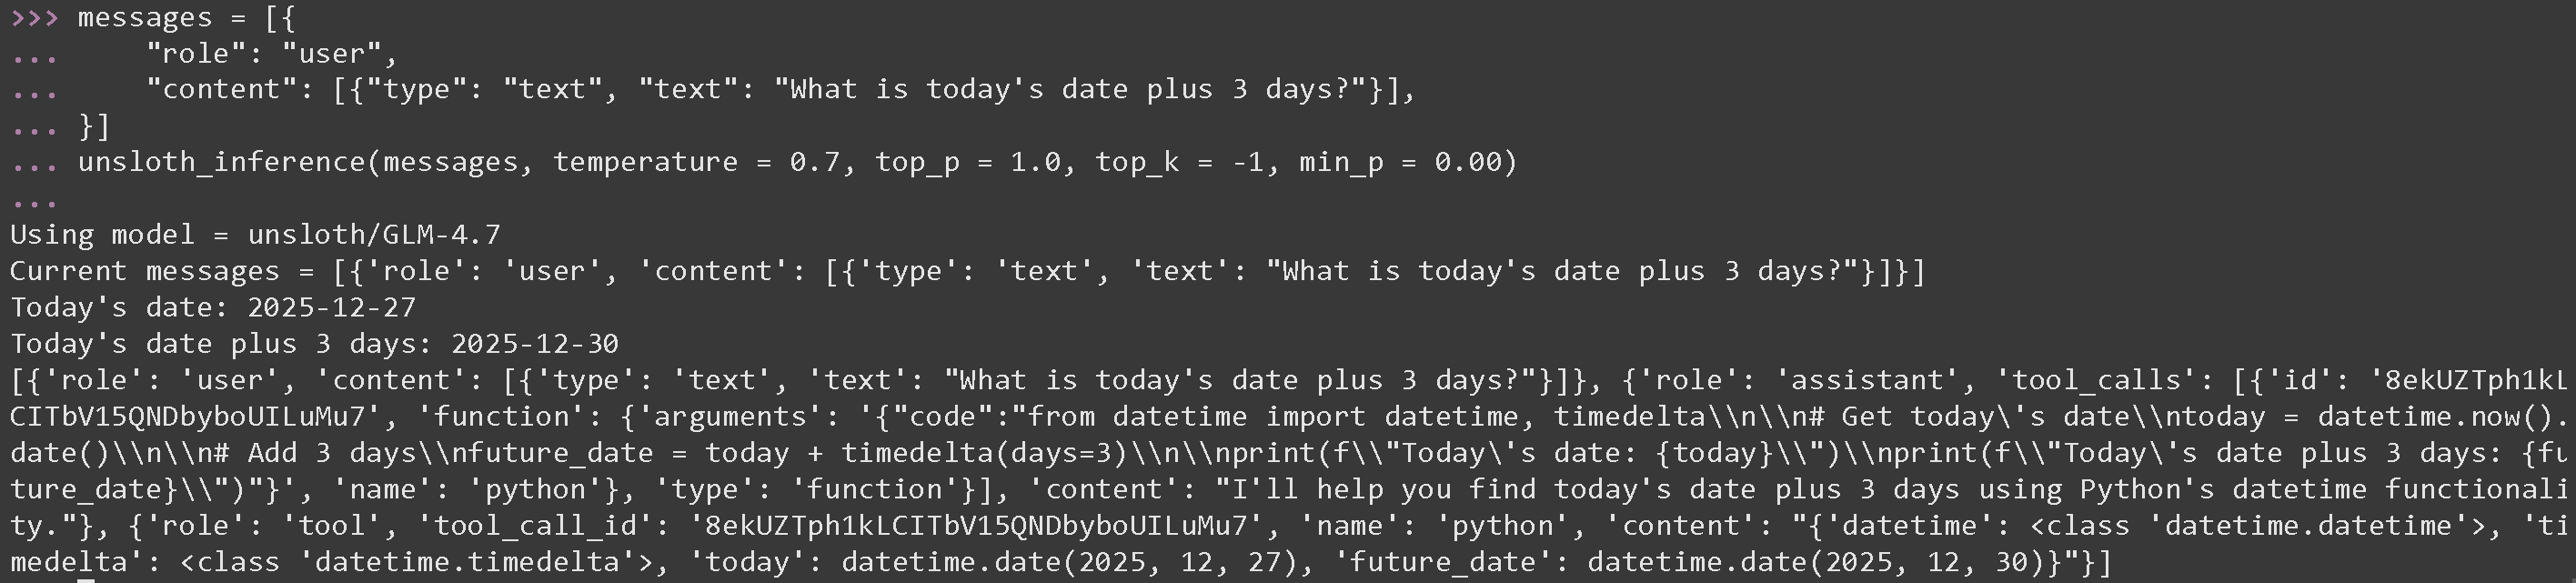
**GLM 4.7 的数学运算工具调用**
{% code overflow="wrap" %}
```python
messages = [{
"role": "user",
"content": [{"type": "text", "text": "今天的日期加 3 天是多少?"}],
}]
unsloth_inference(messages, temperature = 1.0, top_p = 0.95, top_k = -1, min_p = 0.01)
```
{% endcode %}
### :hammer:使用 GLM-4.7-Flash 进行工具调用
见 [tool-calling-guide-for-local-llms](https://unsloth.ai/docs/zh/ji-chu/tool-calling-guide-for-local-llms "mention") 以了解如何进行工具调用的更多细节。在一个新终端中(如果使用 tmux,请使用 CTRL+B+D),我们创建一些工具,例如添加两个数字、执行 Python 代码、执行 Linux 函数,以及更多:
{% code expandable="true" %}
```python
import json, subprocess, random
from typing import Any
def add_number(a: float | str, b: float | str) -> float:
return float(a) + float(b)
def multiply_number(a: float | str, b: float | str) -> float:
return float(a) * float(b)
def substract_number(a: float | str, b: float | str) -> float:
return float(a) - float(b)
def write_a_story() -> str:
return random.choice([
"很久很久以前,在一个遥远的银河系里……",
"有两个朋友,他们热爱树懒和代码……",
"世界即将终结,因为每只树懒都进化出了超人般的智慧……",
"一位朋友并不知道,另一位朋友不小心写了一个让树懒进化的程序……",
])
def terminal(command: str) -> str:
if "rm" in command or "sudo" in command or "dd" in command or "chmod" in command:
msg = "Cannot execute 'rm, sudo, dd, chmod' commands since they are dangerous"
print(msg); return msg
print(f"Executing terminal command `{command}`")
try:
return str(subprocess.run(command, capture_output = True, text = True, shell = True, check = True).stdout)
except subprocess.CalledProcessError as e:
return f"Command failed: {e.stderr}"
def python(code: str) -> str:
data = {}
exec(code, data)
del data["__builtins__"]
return str(data)
MAP_FN = {
"add_number": add_number,
"multiply_number": multiply_number,
"substract_number": substract_number,
"write_a_story": write_a_story,
"terminal": terminal,
"python": python,
}
tools = [
{
"type": "function",
"function": {
"name": "add_number",
"description": "添加两个数字。",
"parameters": {
"type": "object",
"properties": {
"a": {
"type": "string",
"description": "第一个数字。",
},
"b": {
"type": "string",
"description": "第二个数字。",
},
},
"required": ["a", "b"],
},
},
},
{
"type": "function",
"function": {
"name": "multiply_number",
"description": "将两个数字相乘。",
"parameters": {
"type": "object",
"properties": {
"a": {
"type": "string",
"description": "第一个数字。",
},
"b": {
"type": "string",
"description": "第二个数字。",
},
},
"required": ["a", "b"],
},
},
},
{
"type": "function",
"function": {
"name": "substract_number",
"description": "将两个数字相减。",
"parameters": {
"type": "object",
"properties": {
"a": {
"type": "string",
"description": "第一个数字。",
},
"b": {
"type": "string",
"description": "第二个数字。",
},
},
"required": ["a", "b"],
},
},
},
{
"type": "function",
"function": {
"name": "write_a_story",
"description": "写一个随机故事。",
"parameters": {
"type": "object",
"properties": {},
"required": [],
},
},
},
{
"type": "function",
"function": {
"name": "terminal",
"description": "在终端执行操作。",
"parameters": {
"type": "object",
"properties": {
"command": {
"type": "string",
"description": "您希望启动的命令,例如 `ls`、`rm` 等。",
},
},
"required": ["command"],
},
},
},
{
"type": "function",
"function": {
"name": "python",
"description": "调用 Python 解释器并运行一些 Python 代码。",
"parameters": {
"type": "object",
"properties": {
"code": {
"type": "string",
"description": "要运行的 Python 代码",
},
},
"required": ["code"],
},
},
},
]
```
{% endcode %}
然后我们使用下面的函数(复制并粘贴后执行),它们会自动解析函数调用,并为任何模型调用 OpenAI 端点:
{% code overflow="wrap" expandable="true" %}
```python
from openai import OpenAI
def unsloth_inference(
messages,
temperature = 0.7,
top_p = 1.0,
top_k = -1,
repetition_penalty = 0.0,
):
messages = messages.copy()
openai_client = OpenAI(
base_url = "http://127.0.0.1:8001/v1",
api_key = "sk-no-key-required",
)
model_name = next(iter(openai_client.models.list())).id
print(f"Using model = {model_name}")
has_tool_calls = True
original_messages_len = len(messages)
while has_tool_calls:
print(f"Current messages = {messages}")
response = openai_client.chat.completions.create(
model = model_name,
messages = messages,
temperature = temperature,
top_p = top_p,
tools = tools if tools else None,
tool_choice = "auto" if tools else None,
extra_body = {"top_k": top_k, "min_p": min_p, "dry_multiplier" :repetition_penalty,}
)
tool_calls = response.choices[0].message.tool_calls or []
content = response.choices[0].message.content or ""
tool_calls_dict = [tc.to_dict() for tc in tool_calls] if tool_calls else tool_calls
messages.append({"role": "assistant", "tool_calls": tool_calls_dict, "content": content,})
for tool_call in tool_calls:
fx, args, _id = tool_call.function.name, tool_call.function.arguments, tool_call.id
out = MAP_FN[fx](**json.loads(args))
messages.append({"role": "tool", "tool_call_id": _id, "name": fx, "content": str(out),})
else:
has_tool_calls = False
return messages
```
{% endcode %}
在通过以下方式启动 GLM-4.7-Flash 之后 `llama-server` 像在 [#deploy-with-llama-server-and-openais-completion-library](#deploy-with-llama-server-and-openais-completion-library "mention") 或参见 [tool-calling-guide-for-local-llms](https://unsloth.ai/docs/zh/ji-chu/tool-calling-guide-for-local-llms "mention") 了解更多详情后,我们就可以进行一些工具调用:
**GLM 4.7 的数学运算工具调用**
{% code overflow="wrap" %}
```python
messages = [{
"role": "user",
"content": [{"type": "text", "text": "今天的日期加 3 天是多少?"}],
}]
unsloth_inference(messages, temperature = 1.0, top_p = 0.95, top_k = -1, min_p = 0.01)
```
{% endcode %}
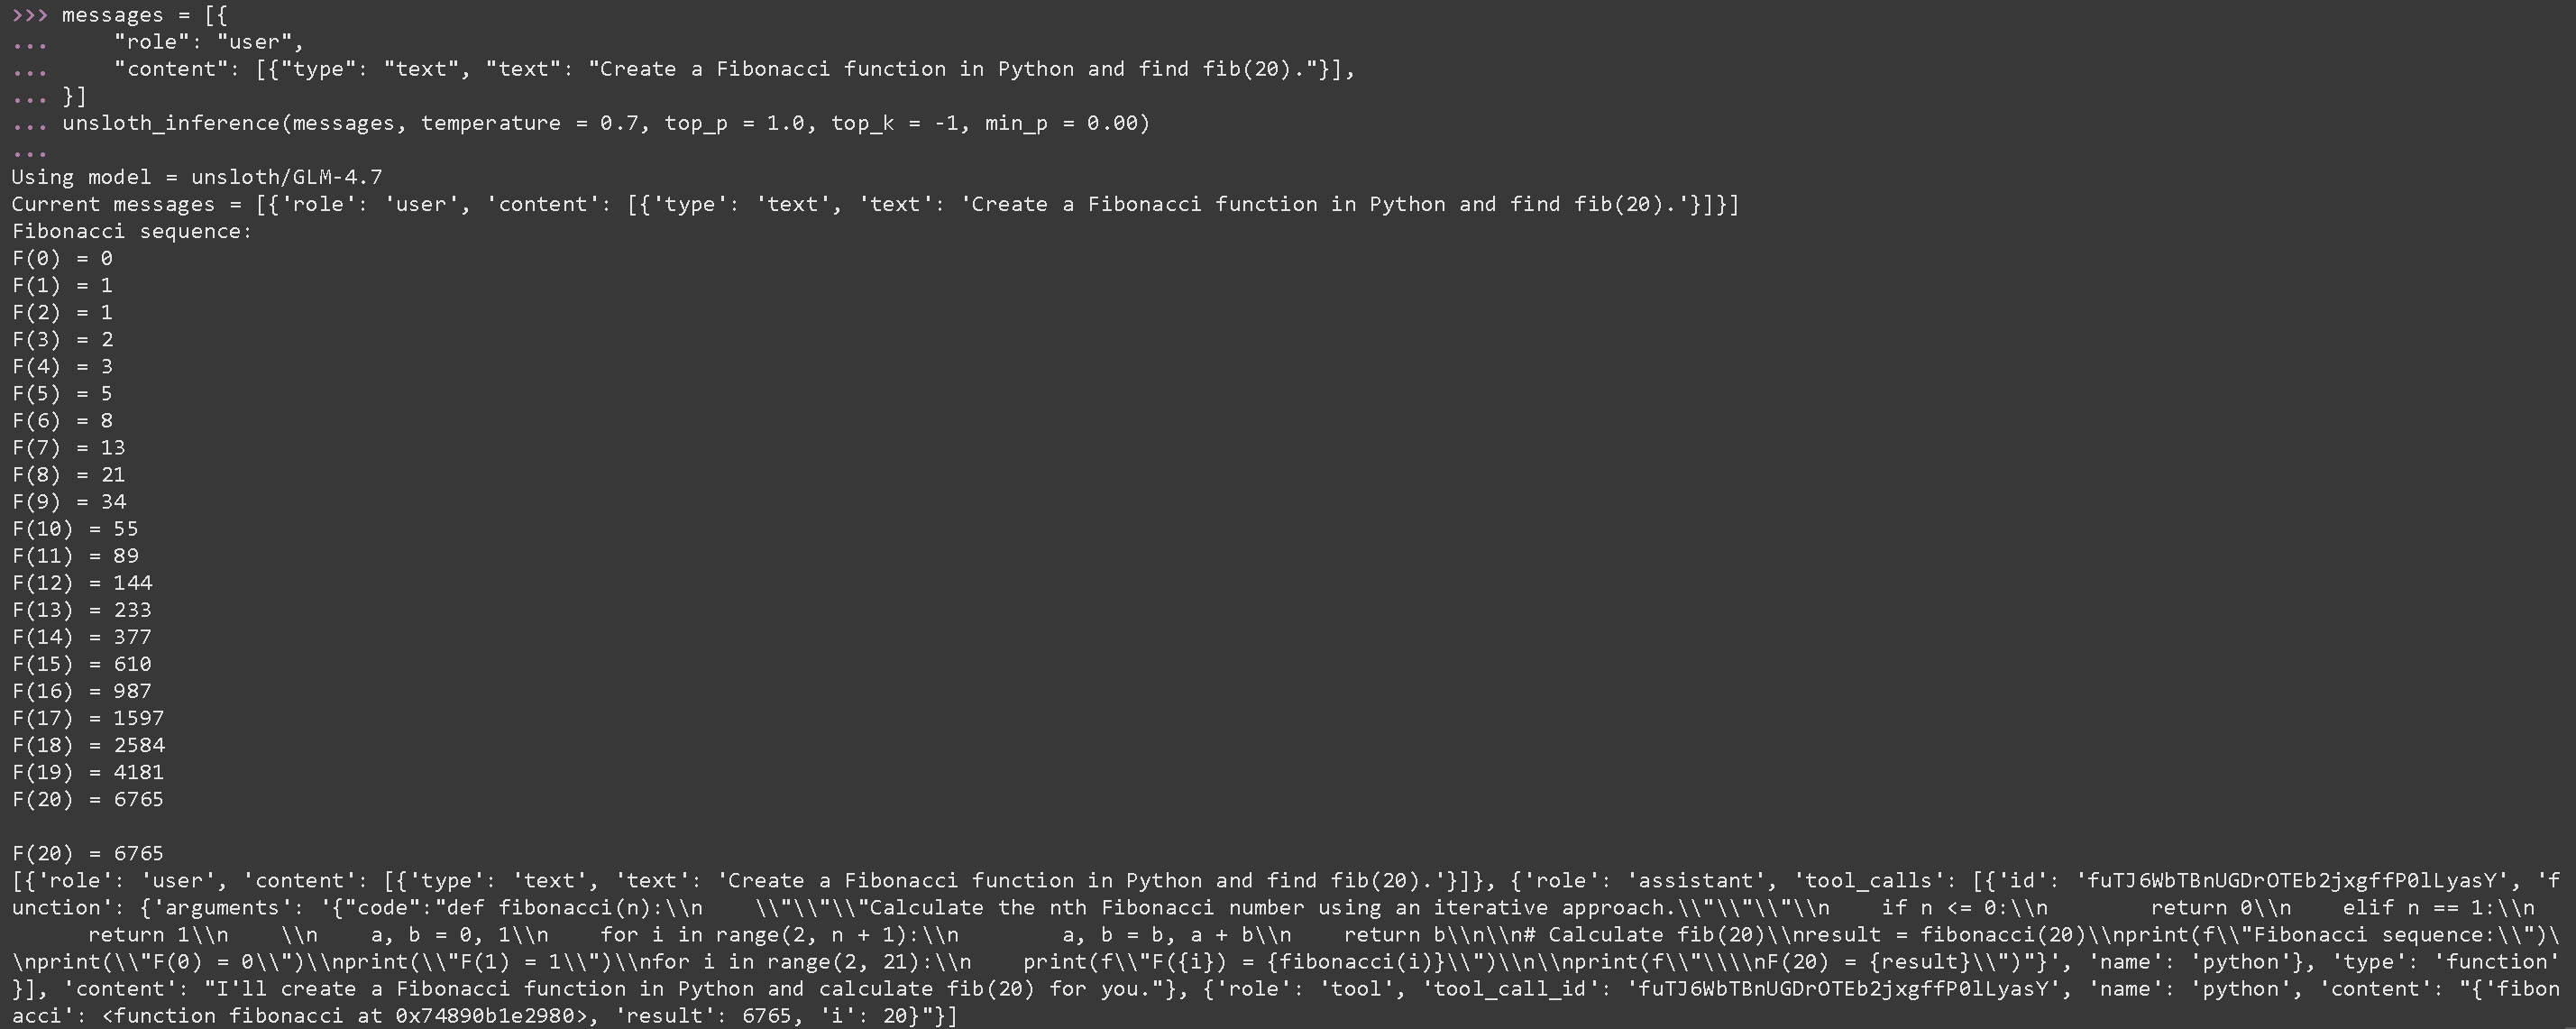
 **用于执行生成的 Python 代码的工具调用,适用于 GLM-4.7-Flash**
{% code overflow="wrap" %}
```python
messages = [{
"role": "user",
"content": [{"type": "text", "text": "用 Python 创建一个斐波那契函数并求 fib(20)。"}],
}]
unsloth_inference(messages, temperature = 1.0, top_p = 0.95, top_k = -1, min_p = 0.01)
```
{% endcode %}
**用于执行生成的 Python 代码的工具调用,适用于 GLM-4.7-Flash**
{% code overflow="wrap" %}
```python
messages = [{
"role": "user",
"content": [{"type": "text", "text": "用 Python 创建一个斐波那契函数并求 fib(20)。"}],
}]
unsloth_inference(messages, temperature = 1.0, top_p = 0.95, top_k = -1, min_p = 0.01)
```
{% endcode %}
 ### 基准测试
GLM-4.7-Flash 是除 AIME 25 之外所有基准测试中表现最好的 30B 模型。
### 基准测试
GLM-4.7-Flash 是除 AIME 25 之外所有基准测试中表现最好的 30B 模型。
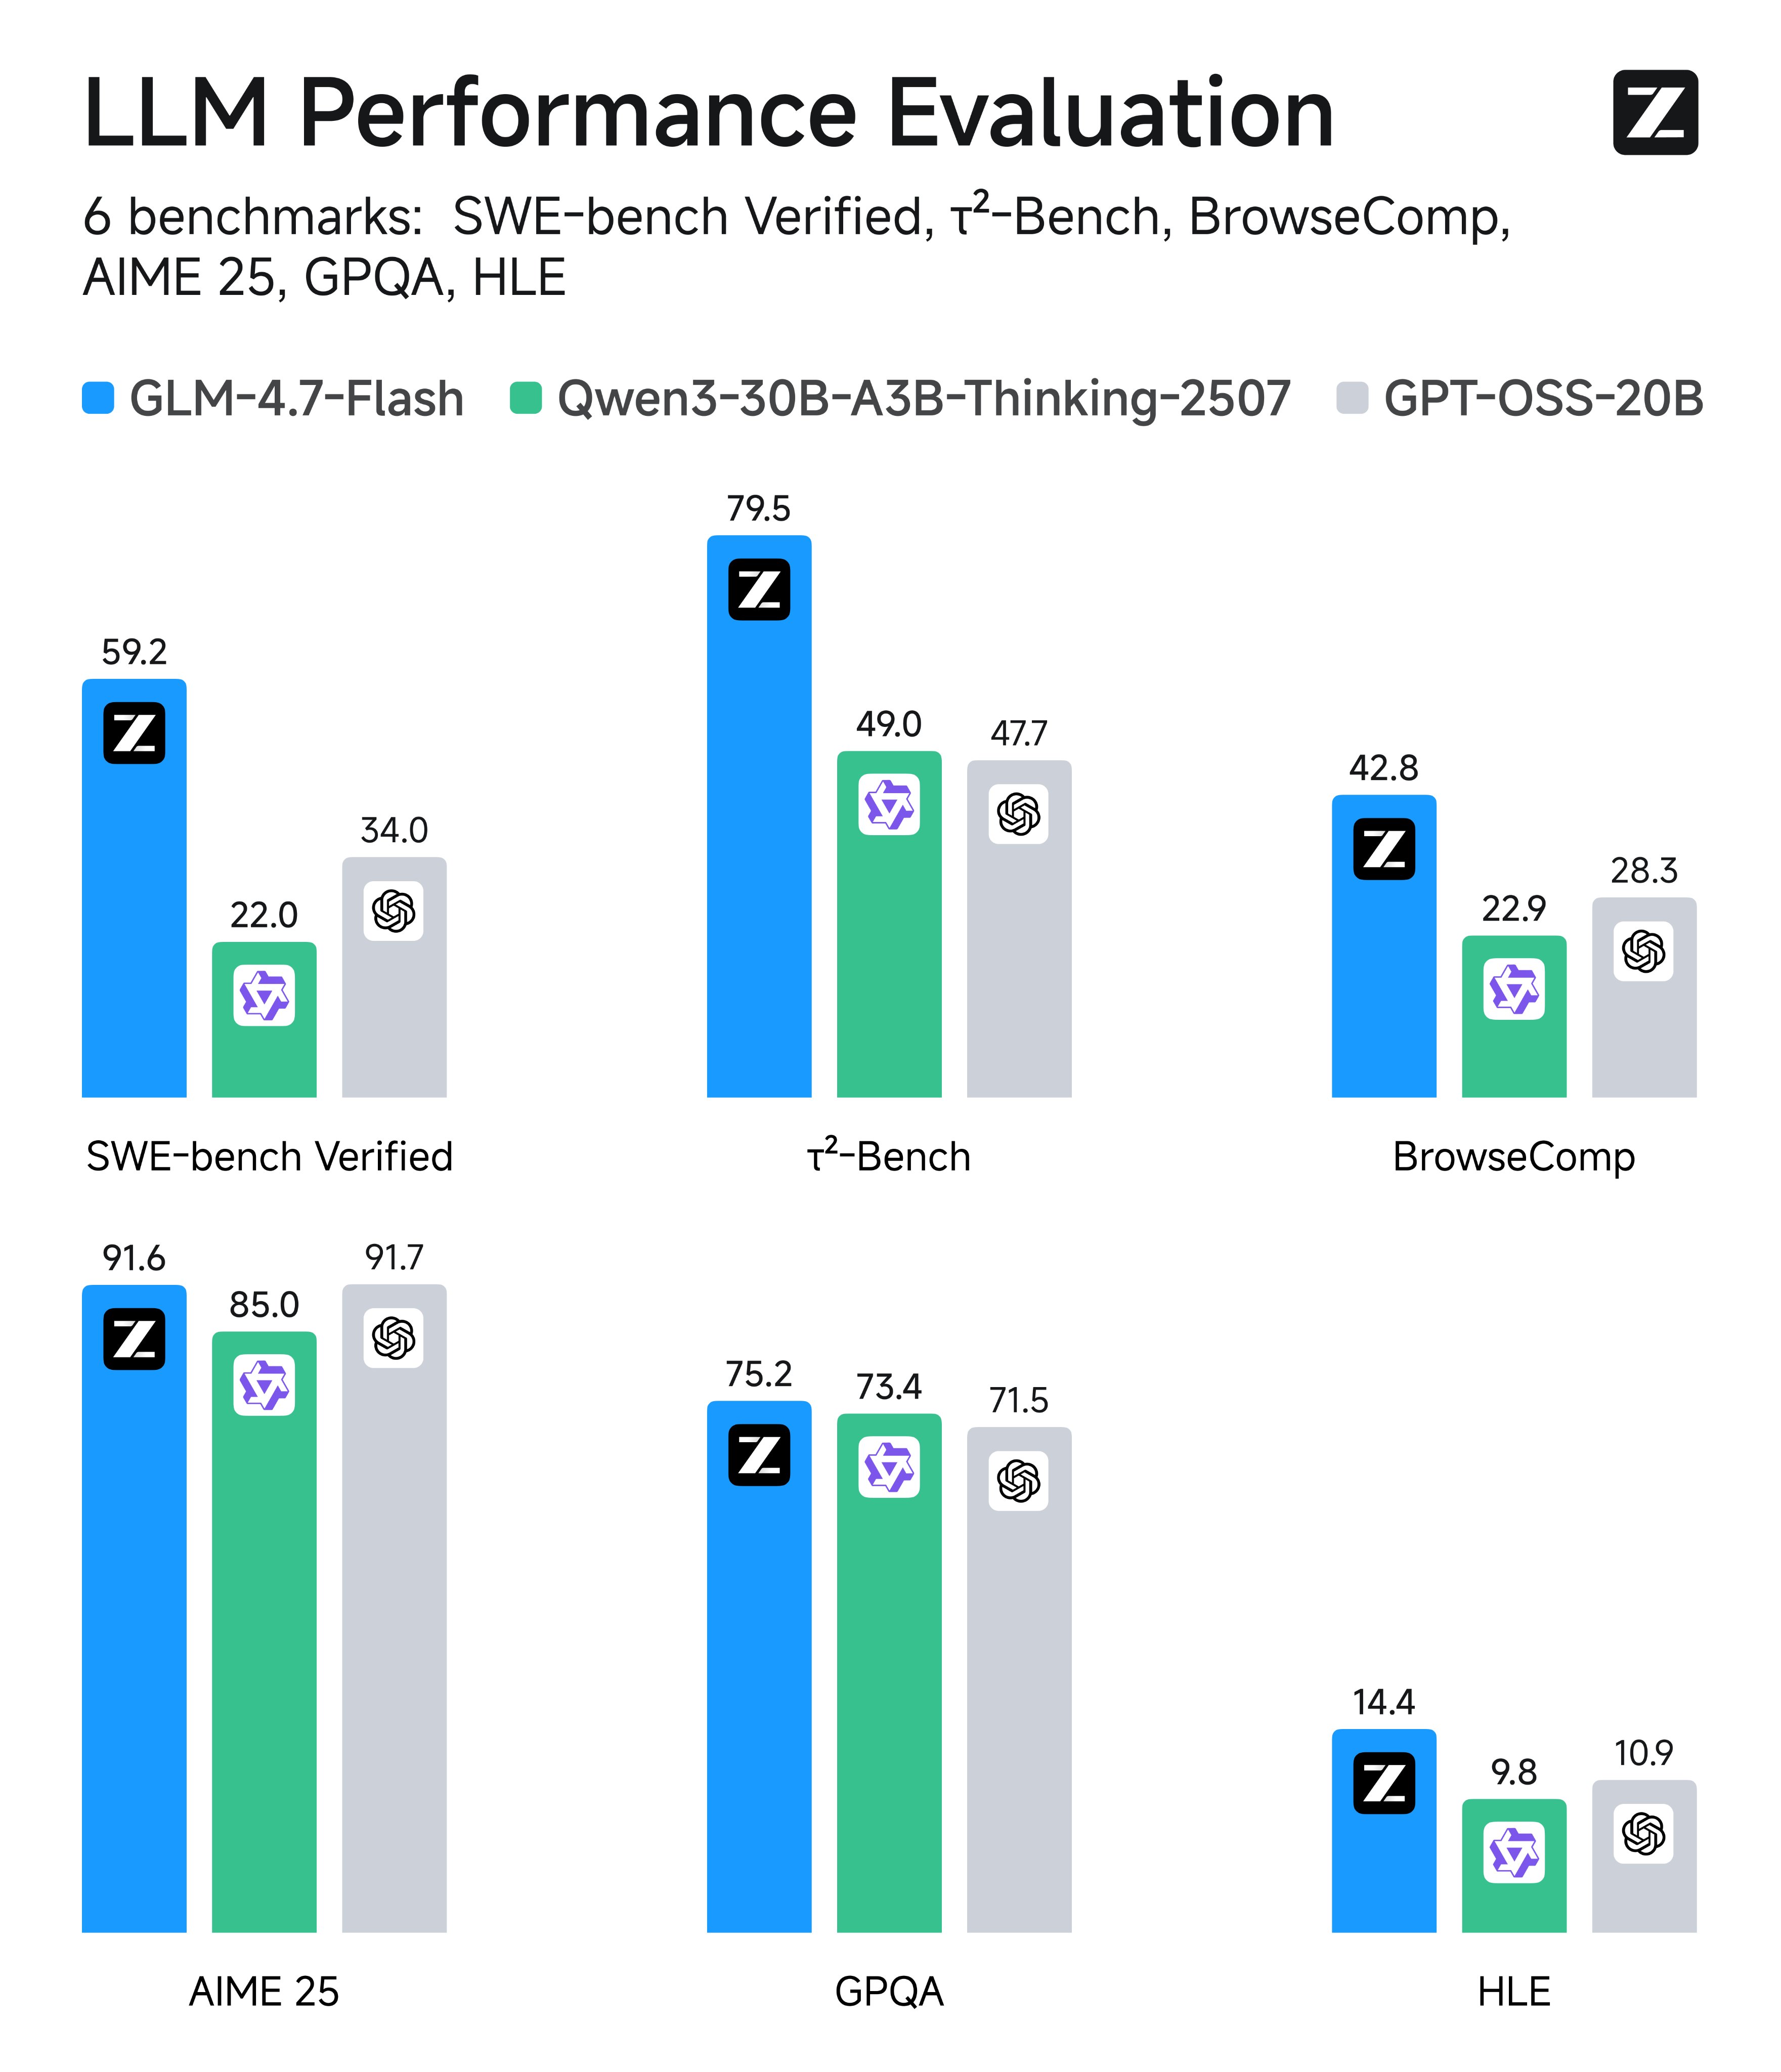 | 基准 | GLM-4.7-Flash | Qwen3-30B-A3B-Thinking-2507 | GPT-OSS-20B |
| ------------------ | ------------- | --------------------------- | ----------- |
| AIME 25 | 91.6 | 85.0 | 91.7 |
| GPQA | 75.2 | 73.4 | 71.5 |
| LCB v6 | 64.0 | 66.0 | 61.0 |
| HLE | 14.4 | 9.8 | 10.9 |
| SWE-bench Verified | 59.2 | 22.0 | 34.0 |
| τ²-Bench | 79.5 | 49.0 | 47.7 |
| BrowseComp | 42.8 | 2.29 | 28.3 |
---
# Agent Instructions: Querying This Documentation
If you need additional information that is not directly available in this page, you can query the documentation dynamically by asking a question.
Perform an HTTP GET request on the current page URL with the `ask` query parameter:
```
GET https://unsloth.ai/docs/zh/mo-xing/glm-4.7-flash.md?ask=
```
The question should be specific, self-contained, and written in natural language.
The response will contain a direct answer to the question and relevant excerpts and sources from the documentation.
Use this mechanism when the answer is not explicitly present in the current page, you need clarification or additional context, or you want to retrieve related documentation sections.
| 基准 | GLM-4.7-Flash | Qwen3-30B-A3B-Thinking-2507 | GPT-OSS-20B |
| ------------------ | ------------- | --------------------------- | ----------- |
| AIME 25 | 91.6 | 85.0 | 91.7 |
| GPQA | 75.2 | 73.4 | 71.5 |
| LCB v6 | 64.0 | 66.0 | 61.0 |
| HLE | 14.4 | 9.8 | 10.9 |
| SWE-bench Verified | 59.2 | 22.0 | 34.0 |
| τ²-Bench | 79.5 | 49.0 | 47.7 |
| BrowseComp | 42.8 | 2.29 | 28.3 |
---
# Agent Instructions: Querying This Documentation
If you need additional information that is not directly available in this page, you can query the documentation dynamically by asking a question.
Perform an HTTP GET request on the current page URL with the `ask` query parameter:
```
GET https://unsloth.ai/docs/zh/mo-xing/glm-4.7-flash.md?ask=
```
The question should be specific, self-contained, and written in natural language.
The response will contain a direct answer to the question and relevant excerpts and sources from the documentation.
Use this mechanism when the answer is not explicitly present in the current page, you need clarification or additional context, or you want to retrieve related documentation sections.