> For the complete documentation index, see [llms.txt](https://unsloth.ai/docs/llms.txt). Markdown versions of documentation pages are available by appending `.md` to page URLs; this page is available as [Markdown](https://unsloth.ai/docs/de/modelle/tutorials/glm-4.7-flash.md).
# GLM-4.7-Flash: So führt man es lokal aus
Führe GLM-4.7-Flash lokal auf deinem Gerät aus und feinabstimme es!
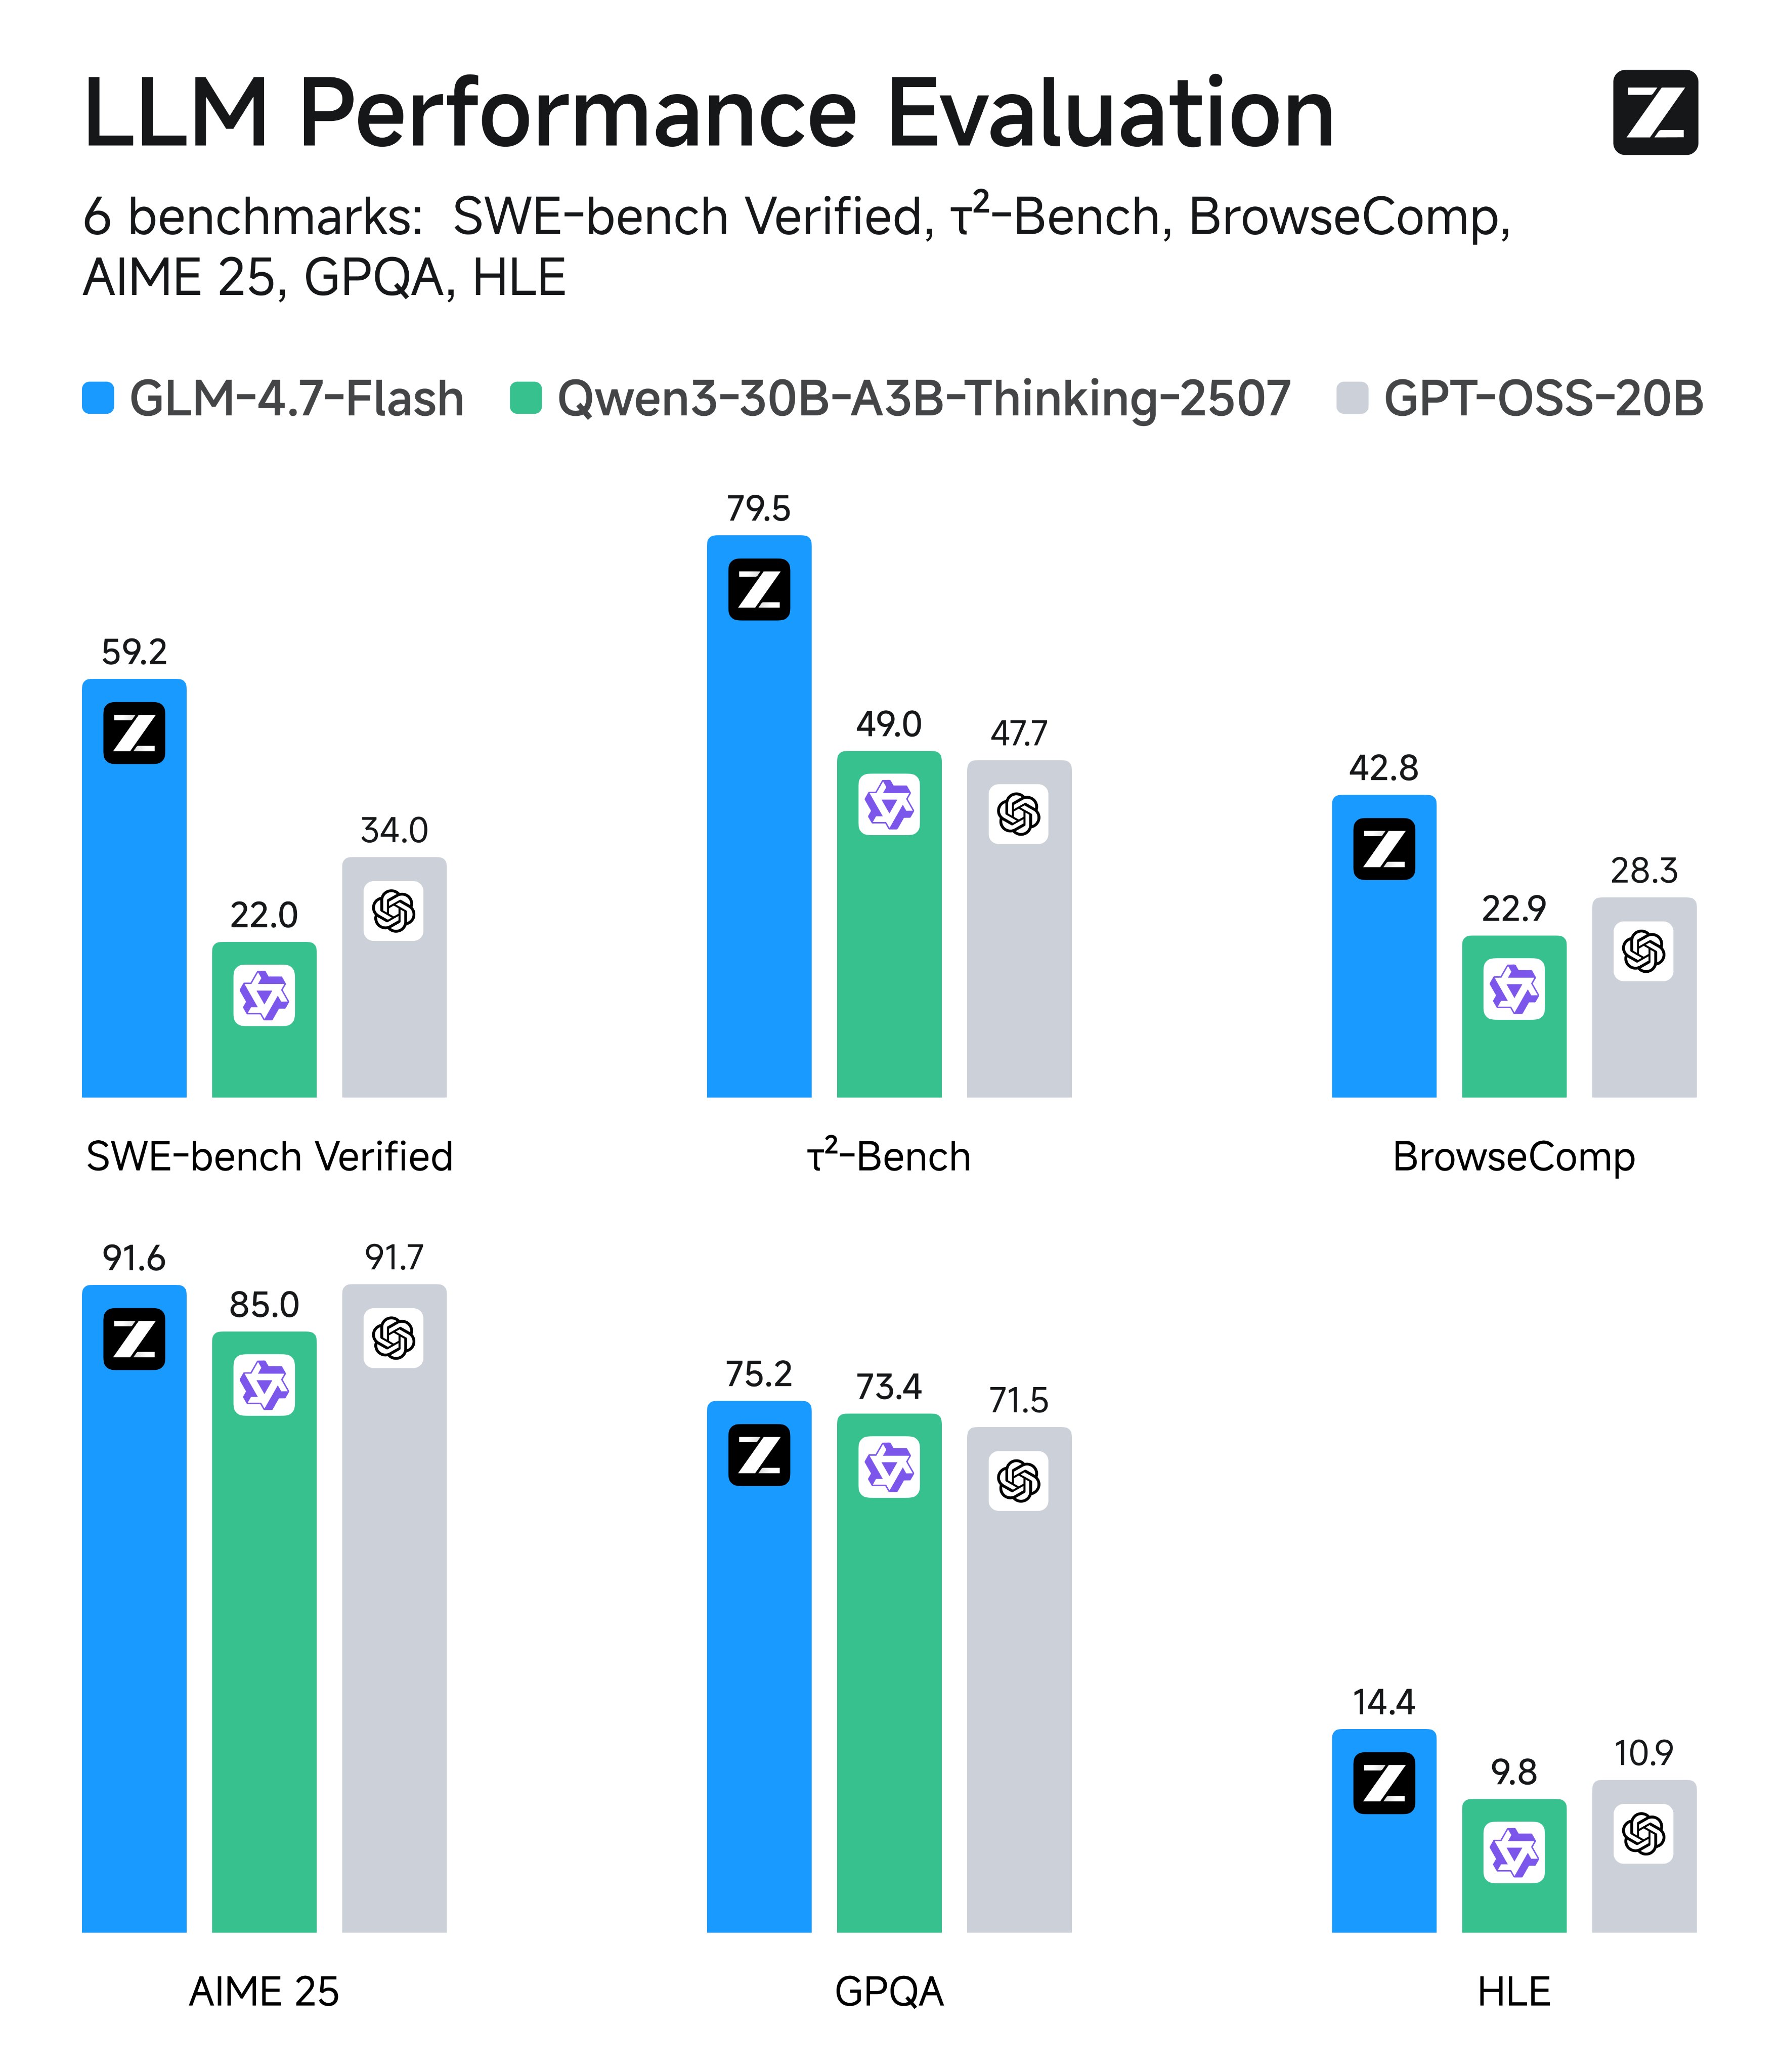
GLM-4.7-Flash ist Z.ais neues 30B-MoE-Reasoning-Modell, das für die lokale Bereitstellung entwickelt wurde und erstklassige Leistung für Codierung, agentische Workflows und Chat bietet. Es verwendet ca. 3,6B Parameter, unterstützt 200K Kontext und führt bei SWE-Bench, GPQA und Reasoning-/Chat-Benchmarks.
GLM-4.7-Flash läuft auf **24 GB RAM**/VRAM/Unified Memory (32 GB für volle Präzision), und du kannst jetzt mit Unsloth feinabstimmen. Um GLM 4.7 Flash mit vLLM auszuführen, siehe [#glm-4.7-flash-in-vllm](#glm-4.7-flash-in-vllm "mention")
{% hint style="success" %}
Update vom 21. Jan.: `llama.cpp` einen Fehler behoben, bei dem der falsche `scoring_func`: `"softmax"` (sollte `"sigmoid"`sein). Dies verursachte Schleifen und schlechte Ausgaben. Wir haben die GGUFs aktualisiert – bitte lade das Modell erneut herunter, um deutlich bessere Ausgaben zu erhalten.
Du kannst jetzt die von Z.ai empfohlenen Parameter verwenden und großartige Ergebnisse erzielen:
* **Für allgemeine Anwendungsfälle:** `--temp 1.0 --top-p 0.95`
* **Für Tool-Aufrufe:** `--temp 0.7 --top-p 1.0`
* **Wiederholungsstrafe:** Deaktiviere sie oder setze `--repeat-penalty 1.0`
22\. Jan.: Schnellere Inferenz ist da, da der FA-Fix für CUDA jetzt zusammengeführt wurde.
{% endhint %}
Ausführungs-TutorialFeinabstimmung
GLM-4.7-Flash-GGUF zum Ausführen: [unsloth/GLM-4.7-Flash-GGUF](https://huggingface.co/unsloth/GLM-4.7-Flash-GGUF)
### ⚙️ Gebrauchsanleitung
Für die beste Leistung stellen Sie sicher, dass Ihr insgesamt verfügbarer Speicher (VRAM + Systemspeicher) die Größe der quantisierten Modelldatei, die Sie herunterladen, übersteigt. Wenn nicht, kann llama.cpp immer noch über SSD/HDD-Offloading ausgeführt werden, aber die Inferenz wird langsamer.
Nach Rücksprache mit dem Team von Z.ai empfehlen sie, ihre Sampling-Parameter für GLM-4.7 zu verwenden:
| Standardeinstellungen (die meisten Aufgaben) | Terminal Bench, SWE Bench Verified |
| ------------------------------------------------------------------ | ------------------------------------------------------------------ |
| **temperature = 1.0** | **temperature = 0.7** |
| **top\_p = 0.95** | **top\_p = 1.0** |
| Wiederholungsstrafe = deaktiviert oder 1.0 | Wiederholungsstrafe = deaktiviert oder 1.0 |
* Für allgemeine Anwendungsfälle: `--temp 1.0 --top-p 0.95`
* Für Tool-Aufrufe: `--temp 0.7 --top-p 1.0`
* Wenn du llama.cpp verwendest, setze `--min-p 0.01` da der Standardwert von llama.cpp 0,05 ist
* Manchmal musst du ausprobieren, welche Werte für deinen Anwendungsfall am besten funktionieren.
{% hint style="warning" %}
Derzeit **empfehlen wir nicht** dieses GGUF auszuführen mit **Ollama** wegen möglicher Kompatibilitätsprobleme mit Chat-Vorlagen. Das GGUF funktioniert gut mit llama.cpp (oder Backends wie LM Studio, Jan).
**Denke daran, die Wiederholungsstrafe zu deaktivieren! Oder setze** `--repeat-penalty 1.0`
{% endhint %}
* **Maximales Kontextfenster:** `202,752`
### 🖥️ GLM-4.7-Flash ausführen
Je nach Anwendungsfall müssen Sie unterschiedliche Einstellungen verwenden. Einige GGUFs haben am Ende ähnliche Größen, weil die Modellarchitektur (wie [gpt-oss](/docs/de/modelle/gpt-oss-how-to-run-and-fine-tune.md)) Dimensionen hat, die nicht durch 128 teilbar sind, sodass Teile nicht auf niedrigere Bits quantisiert werden können.
Da dieser Leitfaden 4-Bit verwendet, benötigst du etwa 18 GB RAM/Unified Memory. Wir empfehlen, mindestens 4-Bit-Präzision für die beste Leistung zu verwenden.
{% hint style="warning" %}
Derzeit **empfehlen wir nicht** dieses GGUF auszuführen mit **Ollama** wegen möglicher Kompatibilitätsprobleme mit Chat-Vorlagen. Das GGUF funktioniert gut mit llama.cpp (oder Backends wie LM Studio, Jan).
**Denke daran, die Wiederholungsstrafe zu deaktivieren! Oder setze** `--repeat-penalty 1.0`
{% endhint %}
#### 🦥 Unsloth Studio-Leitfaden
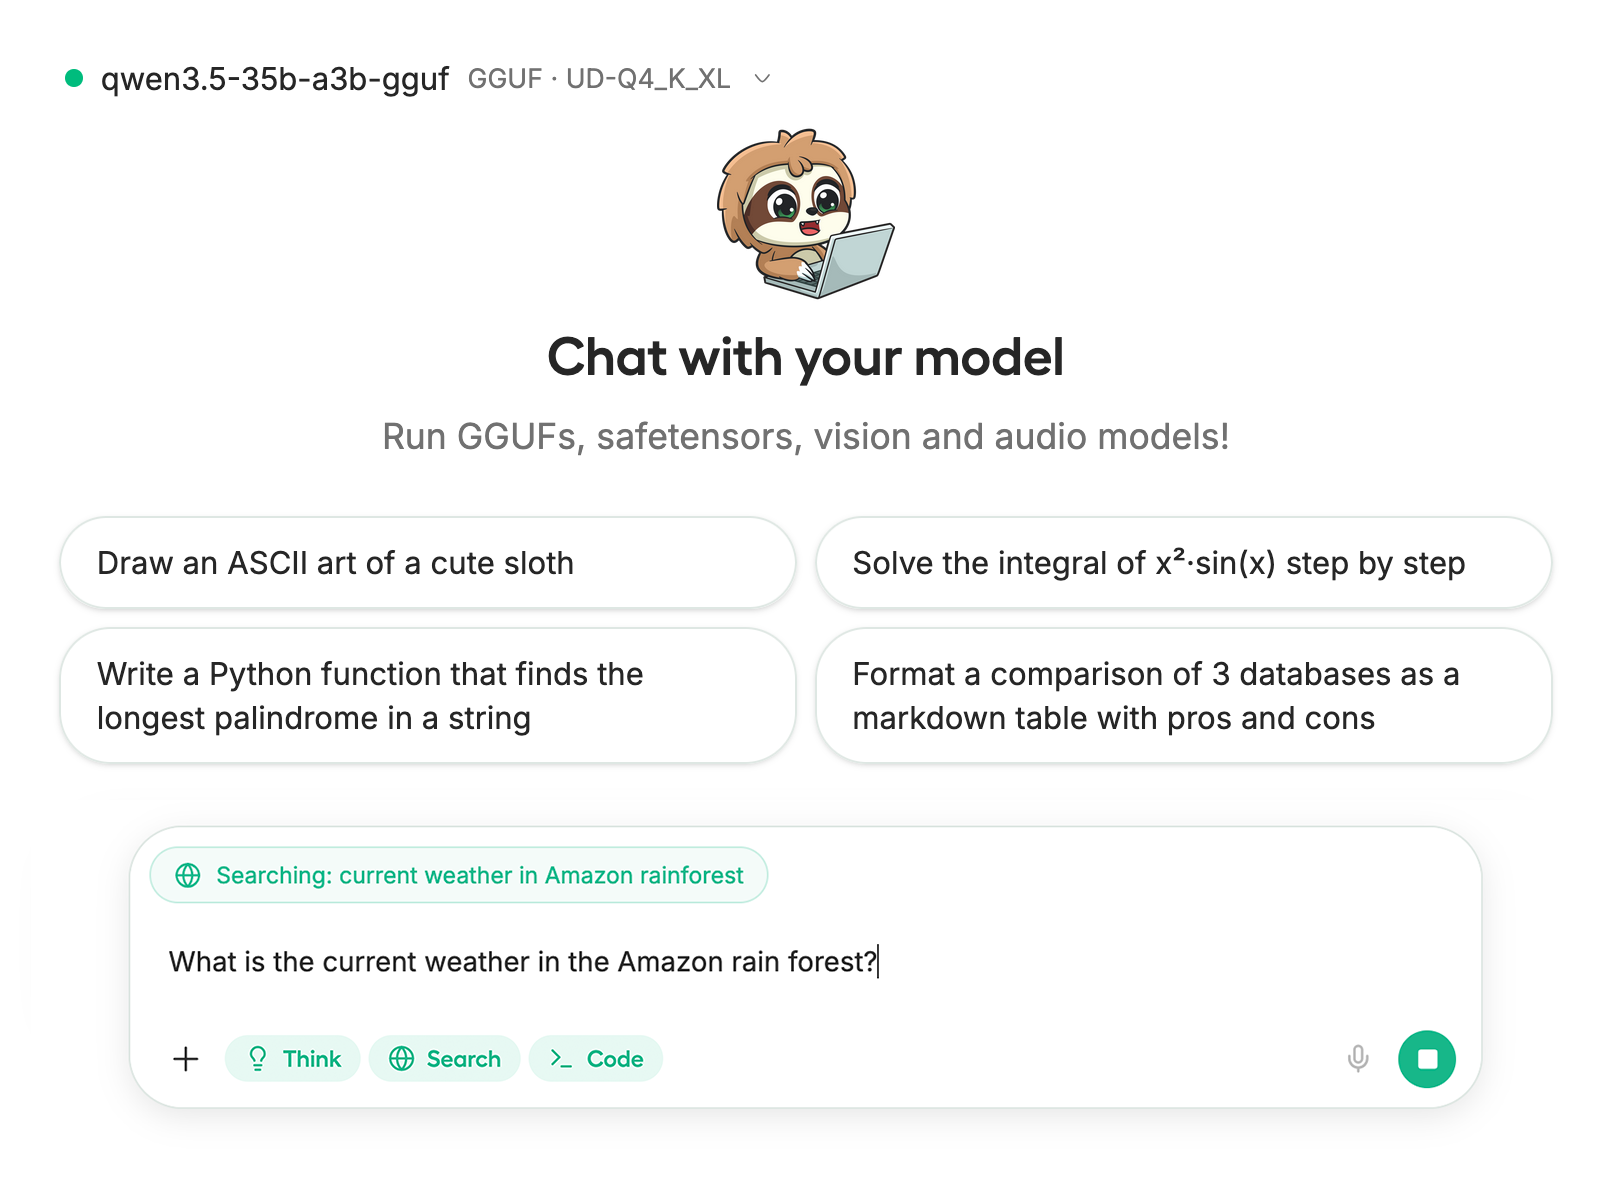
GLM-4.7-Flash kann ausgeführt und feinabgestimmt werden in [Unsloth Studio](/docs/de/neu/studio.md), unserer neuen Open-Source-Web-UI für lokale KI. Mit Unsloth Studio können Sie Modelle lokal auf **macOS, Windows**, Linux und:
{% columns %}
{% column %}
* Suchen, herunterladen, [GGUFs ausführen](/docs/de/neu/studio.md#run-models-locally) und Safetensor-Modelle
* [**Selbstheilend** Tool-Aufrufe](/docs/de/neu/studio.md#execute-code--heal-tool-calling) + **Websuche**
* [**Codeausführung**](/docs/de/neu/studio.md#run-models-locally) (Python, Bash)
* [Automatische Inferenz](https://unsloth.ai/docs/desktop#feature-deep-dive) Abstimmung der Parameter (Temp., Top-p usw.)
* Schnelle CPU- + GPU-Inferenz über llama.cpp
* [LLMs trainieren](/docs/de/neu/studio.md#no-code-training) 2x schneller mit 70 % weniger VRAM
{% endcolumn %}
{% column %}
{% endcolumn %}
{% endcolumns %}
{% stepper %}
{% step %}
**Unsloth installieren**
Führen Sie dies in Ihrem Terminal aus:
macOS, Linux, WSL:
```bash
curl -fsSL https://unsloth.ai/install.sh | sh
```
Windows PowerShell:
```bash
irm https://unsloth.ai/install.ps1 | iex
```
{% hint style="success" %}
**Die Installation geht schnell und dauert ca. 1–2 Min.**
{% endhint %}
{% endstep %}
{% step %}
**Unsloth starten**
macOS, Linux, WSL und Windows:
```bash
unsloth studio -H 0.0.0.0 -p 8888
```
Dann öffnen Sie `http://localhost:8888` in Ihrem Browser.
{% endstep %}
{% step %}
**GLM-4.7-Flash suchen und herunterladen**
Beim ersten Start musst du ein Passwort erstellen, um dein Konto zu sichern, und dich später erneut anmelden. Dann siehst du einen kurzen Einrichtungsassistenten, um ein Modell, einen Datensatz und grundlegende Einstellungen auszuwählen. Du kannst ihn jederzeit überspringen.
Gehen Sie dann zum [Unsloth Chat](/docs/de/neu/studio/chat.md) Registerkarte und suche nach **GLM-4.7-Flash** in der Suchleiste und lade das gewünschte Modell und Quant herunter.
{% endstep %}
{% step %}
**GLM-4.7-Flash ausführen**
Die Inferenzparameter sollten bei der Verwendung von Unsloth Studio automatisch gesetzt werden, Sie können sie jedoch weiterhin manuell ändern. Sie können auch die Kontextlänge, das Chat-Template und andere Einstellungen bearbeiten.
Für weitere Informationen können Sie unseren [Inferenzleitfaden für Unsloth Studio](/docs/de/neu/studio/chat.md).
{% endstep %}
{% endstepper %}
#### Llama.cpp-Tutorial (GGUF):
Anweisungen zur Ausführung in llama.cpp (beachten Sie, dass wir 4-Bit verwenden werden, damit es auf die meisten Geräte passt):
{% stepper %}
{% step %}
Holen Sie sich die neueste `llama.cpp` auf [hier auf GitHub](https://github.com/ggml-org/llama.cpp). Sie können auch die folgenden Build-Anweisungen befolgen. Ändern Sie `-DGGML_CUDA=ON` zu `-DGGML_CUDA=OFF` wenn Sie keine GPU haben oder nur CPU-Inferenz möchten. **Für Apple-Mac-/Metal-Geräte**, setzen Sie `-DGGML_CUDA=OFF` und fahren Sie dann wie gewohnt fort – Metal-Unterstützung ist standardmäßig aktiviert.
{% code overflow="wrap" %}
```bash
apt-get update
apt-get install pciutils build-essential cmake curl libcurl4-openssl-dev -y
git clone https://github.com/ggml-org/llama.cpp
cmake llama.cpp -B llama.cpp/build \\
-DBUILD_SHARED_LIBS=OFF -DGGML_CUDA=ON
cmake --build llama.cpp/build --config Release -j --clean-first --target llama-cli llama-mtmd-cli llama-server llama-gguf-split
cp llama.cpp/build/bin/llama-* llama.cpp
```
{% endcode %}
{% endstep %}
{% step %}
Du kannst direkt von Hugging Face ziehen. Du kannst den Kontext auf 200K erhöhen, solange dein RAM/VRAM es zulässt.
Du kannst auch die von Z.ai empfohlenen Sampling-Parameter für GLM-4.7 ausprobieren:
* Für allgemeine Anwendungsfälle: `--temp 1.0 --top-p 0.95`
* Für Tool-Aufrufe: `--temp 0.7 --top-p 1.0`
* **Denke daran, die Wiederholungsstrafe zu deaktivieren!**
Befolgen Sie dies für **allgemeine Anweisungen** Anwendungsfälle:
```bash
./llama.cpp/llama-cli \\
-hf unsloth/GLM-4.7-Flash-GGUF:UD-Q4_K_XL \\
--ctx-size 16384 \\
--temp 1.0 --top-p 0.95 --min-p 0.01
```
Befolgen Sie dies für **Tool-Aufruf** Anwendungsfälle:
```bash
./llama.cpp/llama-cli \\
-hf unsloth/GLM-4.7-Flash-GGUF:UD-Q4_K_XL \\
--ctx-size 16384 \\
--temp 0.7 --top-p 1.0 --min-p 0.01
```
{% endstep %}
{% step %}
Lade das Modell über (nach der Installation von `pip install huggingface_hub`). Sie können `UD-Q4_K_XL` oder andere quantisierte Versionen. Wenn Downloads hängen bleiben, siehe [Hugging Face Hub, XET-Debugging](/docs/de/grundlagen/troubleshooting-and-faqs/hugging-face-hub-xet-debugging.md)
{% code overflow="wrap" %}
```bash
pip install -U huggingface_hub
hf download unsloth/GLM-4.7-Flash-GGUF \\
--local-dir unsloth/GLM-4.7-Flash-GGUF \\
--include "*UD-Q2_K_XL*"
```
{% endcode %}
{% endstep %}
{% step %}
Führen Sie das Modell dann im Konversationsmodus aus:
{% code overflow="wrap" %}
```bash
./llama.cpp/llama-cli \\
--model unsloth/GLM-4.7-Flash-GGUF/GLM-4.7-Flash-UD-Q4_K_XL.gguf \\
--ctx-size 16384 \\
--seed 3407 \\
--temp 1.0 \\
--top-p 0.95 \\
--min-p 0.01
```
{% endcode %}
Passen Sie außerdem **das Kontextfenster** wie erforderlich, bis zu `202752`
{% endstep %}
{% endstepper %}
### :loop:Wiederholungen und Schleifen reduzieren
{% hint style="success" %}
**UPDATE 21. JAN.: llama.cpp hat einen Fehler behoben, bei dem der falsche** `"scoring_func": "softmax"` **der Schleifen und schlechte Ausgaben verursachte (sollte sigmoid sein). Wir haben die GGUFs aktualisiert. Bitte lade das Modell erneut herunter, um deutlich bessere Ausgaben zu erhalten.**
{% endhint %}
Das bedeutet, dass du jetzt die von Z.ai empfohlenen Parameter verwenden und großartige Ergebnisse erzielen kannst:
* Für allgemeine Anwendungsfälle: `--temp 1.0 --top-p 0.95`
* Für Tool-Aufrufe: `--temp 0.7 --top-p 1.0`
* Wenn du llama.cpp verwendest, setze `--min-p 0.01` da der Standardwert von llama.cpp 0,05 ist
* **Denke daran, die Wiederholungsstrafe zu deaktivieren! Oder setze** `--repeat-penalty 1.0`
Wir haben `"scoring_func": "sigmoid"` zu `config.json` für das Hauptmodell – [siehe](https://huggingface.co/unsloth/GLM-4.7-Flash/commit/3fd53b491e04f707f307aef2f70f8a7520511e6d).
{% hint style="warning" %}
Derzeit **empfehlen wir nicht** dieses GGUF auszuführen mit **Ollama** wegen möglicher Kompatibilitätsprobleme mit Chat-Vorlagen. Das GGUF funktioniert gut mit llama.cpp (oder Backends wie LM Studio, Jan).
{% endhint %}
### :bird:Flappy-Bird-Beispiel mit UD-Q4\_K\_XL
Als Beispiel haben wir den folgenden langen Dialog mithilfe von UD-Q4\_K\_XL über `./llama.cpp/llama-cli --model unsloth/GLM-4.7-Flash-GGUF/GLM-4.7-Flash-UD-Q4_K_XL.gguf --fit on --temp 1.0 --top-p 0.95 --min-p 0.01` :
```
Hallo
Was ist 2+2
Erstelle ein Flappy-Bird-Spiel in Python
Erstelle ein völlig anderes Spiel in Rust
Finde Fehler in beiden
Erstelle das erste Spiel, das ich erwähnt habe, aber als eigenständige HTML-Datei
Finde Fehler und zeige das behobene Spiel
```
wodurch das folgende Flappy-Bird-Spiel in HTML-Form gerendert wurde:
Flappy-Bird-Spiel in HTML (erweiterbar)
```html
Flappy Bird behoben
0
FLAPPY BIRD
Tippe oder drücke die Leertaste, um zu starten
SPIEL VORBEI
Punkte: 0
```
Und wir haben einige Screenshots gemacht (4-Bit funktioniert):
### 🦥 Feinabstimmung von GLM-4.7-Flash
Unsloth unterstützt jetzt das Feinabstimmen von GLM-4.7-Flash, allerdings musst du `transformers v5`. Das 30B-Modell passt nicht auf eine kostenlose Colab-GPU; du kannst jedoch unser Notebook verwenden. Das 16-Bit-LoRA-Finetuning von GLM-4.7-Flash wird ungefähr **60 GB VRAM**:
* [GLM-4.7-Flash SFT-LoRA-Notebook](https://colab.research.google.com/github/unslothai/notebooks/blob/main/nb/GLM_Flash_A100\(80GB\).ipynb)
{% hint style="warning" %}
Bei der Verwendung von A100 mit 40 GB VRAM kann es gelegentlich zu Out-of-Memory-Problemen kommen. Für reibungslosere Läufe benötigst du H100/A100 mit 80 GB VRAM.
{% endhint %}
{% embed url="" %}
Beim Feinabstimmen von MoE-Modellen ist es wahrscheinlich keine gute Idee, die Router-Schicht feinabzustimmen, daher haben wir sie standardmäßig deaktiviert. Wenn du seine Schlussfolgerungsfähigkeiten beibehalten möchtest (optional), kannst du eine Mischung aus direkten Antworten und Chain-of-Thought-Beispielen verwenden. Verwende mindestens 75 % Reasoning und 25 % Nicht-Reasoning in Ihrem Datensatz, damit das Modell seine Reasoning-Fähigkeiten beibehält.
### 🦙Llama-Server-Bereitstellung & Deployment
Um GLM-4.7-Flash produktiv bereitzustellen, verwenden wir `llama-server` In einem neuen Terminal, z. B. über tmux, stelle das Modell mit Folgendem bereit:
{% code overflow="wrap" %}
```bash
./llama.cpp/llama-server \\
--model unsloth/GLM-4.7-Flash-GGUF/GLM-4.7-Flash-UD-Q4_K_XL.gguf \\
--alias "unsloth/GLM-4.7-Flash" \\
--seed 3407 \\
--temp 1.0 \\
--top-p 0.95 \\
--min-p 0.01 \\
--ctx-size 16384 \\
--port 8001
```
{% endcode %}
Dann in einem neuen Terminal, nachdem du `pip install openai`, mache Folgendes:
{% code overflow="wrap" %}
```python
from openai import OpenAI
import json
openai_client = OpenAI(
base_url = "http://127.0.0.1:8001/v1",
api_key = "sk-no-key-required",
)
completion = openai_client.chat.completions.create(
model = "unsloth/GLM-4.7-Flash",
messages = [{"role": "user", "content": "Was ist 2+2?"},],
)
print(completion.choices[0].message.content)
```
{% endcode %}
Was ausgeben wird
{% code overflow="wrap" %}
```
Der Benutzer stellt eine einfache Frage: "Was ist 2+2?" Die Antwort ist 4. Gib die Antwort aus.
2 + 2 = 4.
```
{% endcode %}
### :computer: GLM-4.7-Flash in vLLM
Du kannst jetzt unser neues [FP8-Dynamic-Quant](https://huggingface.co/unsloth/GLM-4.7-Flash-FP8-Dynamic) des Modells für Premium- und schnelle Inferenz. Installiere zuerst vLLM aus dem Nightly-Build:
{% code overflow="wrap" %}
```bash
uv pip install --upgrade --force-reinstall vllm --torch-backend=auto --extra-index-url https://wheels.vllm.ai/nightly/cu130
uv pip install --upgrade --force-reinstall git+https://github.com/huggingface/transformers.git
uv pip install --force-reinstall numba
```
{% endcode %}
Dann bereitstellen [Unsloths dynamische FP8-Version](https://huggingface.co/unsloth/GLM-4.7-Flash-FP8-Dynamic) des Modells. Wir haben FP8 aktiviert, um die KV-Cache-Speichernutzung um 50 % zu reduzieren, und auf 4 GPUs. Wenn du 1 GPU hast, verwende `CUDA_VISIBLE_DEVICES='0'` und setze `--tensor-parallel-size 1` oder entferne dieses Argument. Um FP8 zu deaktivieren, entferne `--quantization fp8 --kv-cache-dtype fp8`
```bash
export PYTORCH_CUDA_ALLOC_CONF=expandable_segments:False
CUDA_VISIBLE_DEVICES='0,1,2,3' vllm serve unsloth/GLM-4.7-Flash-FP8-Dynamic \\
--served-model-name unsloth/GLM-4.7-Flash \\
--tensor-parallel-size 4 \\
--tool-call-parser glm47 \\
--reasoning-parser glm45 \\
--enable-auto-tool-choice \\
--dtype bfloat16 \\
--seed 3407 \\
--max-model-len 200000 \\
--gpu-memory-utilization 0.95 \\
--max_num_batched_tokens 16384 \\
--port 8001 \
--kv-cache-dtype fp8
```
Sie können das bereitgestellte Modell dann über die OpenAI-API aufrufen:
```python
from openai import AsyncOpenAI, OpenAI
openai_api_key = "EMPTY"
openai_api_base = "http://localhost:8001/v1"
client = OpenAI( # oder AsyncOpenAI
api_key=openai_api_key,
base_url=openai_api_base,
)
```
#### :star: Spekulatives Decoding von GLM-4.7-Flash in vLLM
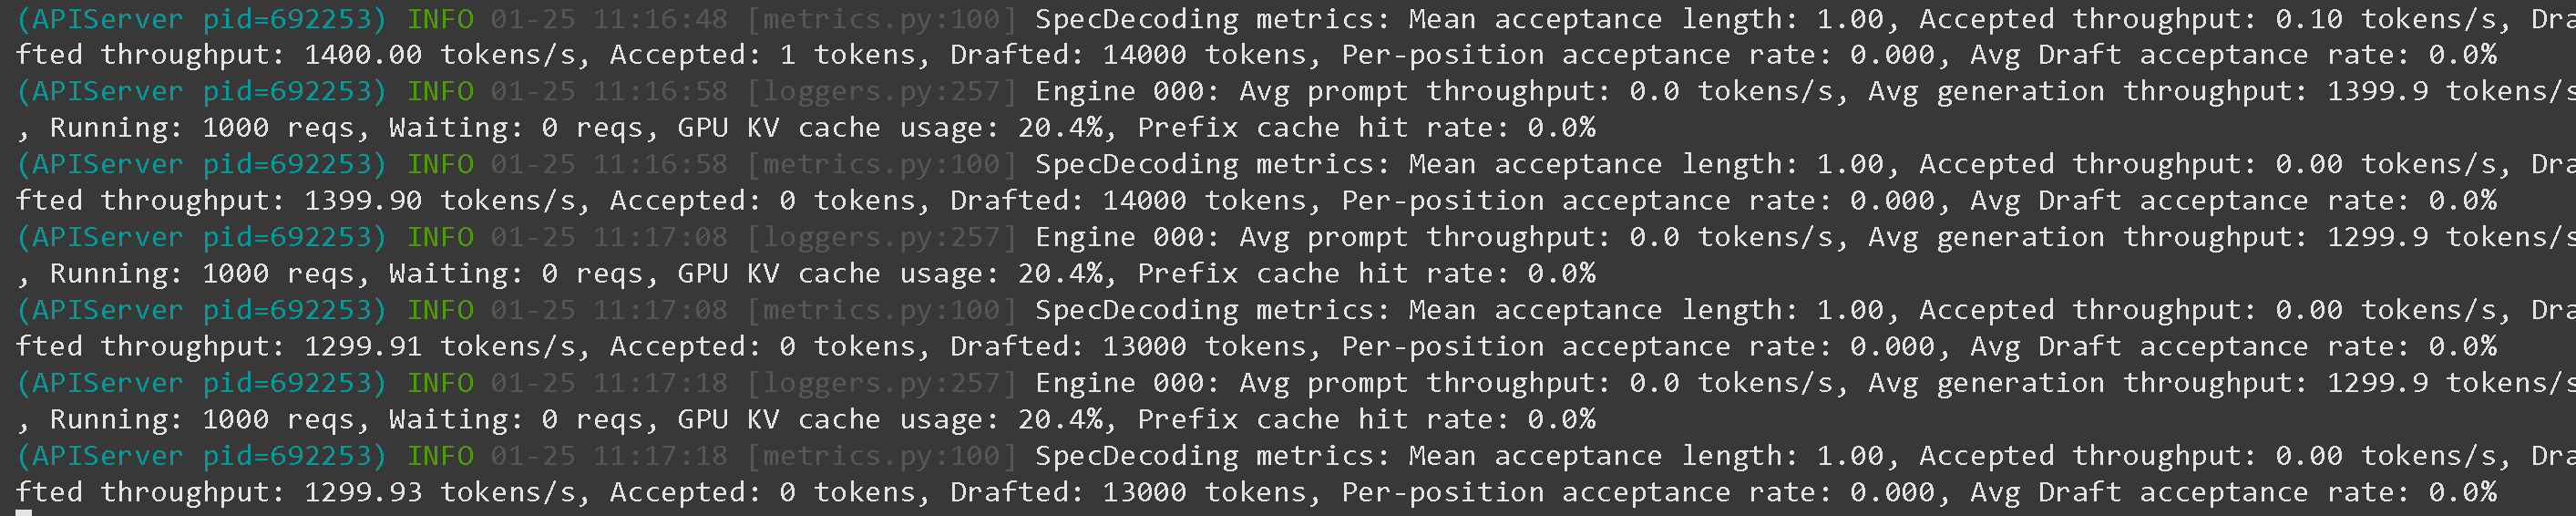
Wir haben festgestellt, dass die Verwendung des MTP-(Multi-Token-Prediction)-Moduls von GLM 4.7 Flash den Generierungsdurchsatz von 13.000 Tokens auf 1 B200 auf 1.300 Tokens reduziert! (10x langsamer) Auf Hopper sollte es hoffentlich in Ordnung sein.
```bash
--speculative-config.method mtp \\
--speculative-config.num_speculative_tokens 1
```
Nur 1.300 Tokens/s Durchsatz auf 1xB200 (130 Tokens/s Decoding pro Benutzer)
Und 13.000 Tokens/s Durchsatz auf 1xB200 (immer noch 130 Tokens/s Decoding pro Benutzer)
### :hammer:Tool-Aufrufe mit GLM-4.7-Flash
Siehe [Tool Calling Guide](/docs/de/grundlagen/tool-calling-guide-for-local-llms.md) für weitere Details dazu, wie man Tool-Calling durchführt. In einem neuen Terminal (wenn Sie tmux verwenden, nutzen Sie CTRL+B+D) erstellen wir einige Tools wie das Addieren von 2 Zahlen, das Ausführen von Python-Code, das Ausführen von Linux-Funktionen und vieles mehr:
{% code expandable="true" %}
```python
import json, subprocess, random
from typing import Any
def add_number(a: float | str, b: float | str) -> float:
return float(a) + float(b)
def multiply_number(a: float | str, b: float | str) -> float:
return float(a) * float(b)
def subtract_number(a: float | str, b: float | str) -> float:
return float(a) - float(b)
def write_a_story() -> str:
return random.choice([
"Vor langer Zeit in einer weit, weit entfernten Galaxie...",
"Es gab 2 Freunde, die Faultiere und Code liebten...",
"Die Welt ging unter, weil sich jedes Faultier zu übermenschlicher Intelligenz entwickelte...",
"Ohne es einander zu wissen, programmierte ein Freund versehentlich ein Programm, das Faultiere weiterentwickelte...",
])
def terminal(command: str) -> str:
if "rm" in command or "sudo" in command or "dd" in command or "chmod" in command:
msg = "Befehle 'rm, sudo, dd, chmod' können nicht ausgeführt werden, da sie gefährlich sind"
print(msg); return msg
print(f"Führe Terminalbefehl `{command}` aus")
try:
return str(subprocess.run(command, capture_output = True, text = True, shell = True, check = True).stdout)
except subprocess.CalledProcessError as e:
return f"Befehl fehlgeschlagen: {e.stderr}"
def python(code: str) -> str:
data = {}
exec(code, data)
del data["__builtins__"]
return str(data)
MAP_FN = {
"add_number": add_number,
"multiply_number": multiply_number,
"subtract_number": subtract_number,
"write_a_story": write_a_story,
"terminal": terminal,
"python": python,
}
tools = [
{
"type": "function",
"function": {
"name": "add_number",
"description": "Addiere zwei Zahlen.",
"parameters": {
"type": "object",
"properties": {
"a": {
"type": "string",
"description": "Die erste Zahl.",
},
"b": {
"type": "string",
"description": "Die zweite Zahl.",
},
},
"required": ["a", "b"],
},
},
},
{
"type": "function",
"function": {
"name": "multiply_number",
"description": "Multipliziere zwei Zahlen.",
"parameters": {
"type": "object",
"properties": {
"a": {
"type": "string",
"description": "Die erste Zahl.",
},
"b": {
"type": "string",
"description": "Die zweite Zahl.",
},
},
"required": ["a", "b"],
},
},
},
{
"type": "function",
"function": {
"name": "subtract_number",
"description": "Subtrahiere zwei Zahlen.",
"parameters": {
"type": "object",
"properties": {
"a": {
"type": "string",
"description": "Die erste Zahl.",
},
"b": {
"type": "string",
"description": "Die zweite Zahl.",
},
},
"required": ["a", "b"],
},
},
},
{
"type": "function",
"function": {
"name": "write_a_story",
"description": "Schreibt eine zufällige Geschichte.",
"parameters": {
"type": "object",
"properties": {},
"required": [],
},
},
},
{
"type": "function",
"function": {
"name": "terminal",
"description": "Führe Operationen im Terminal aus.",
"parameters": {
"type": "object",
"properties": {
"command": {
"type": "string",
"description": "Der Befehl, den du ausführen möchtest, z. B. `ls`, `rm`, ...",
},
},
"required": ["command"],
},
},
},
{
"type": "function",
"function": {
"name": "python",
"description": "Rufe einen Python-Interpreter mit etwas Python-Code auf, der ausgeführt wird.",
"parameters": {
"type": "object",
"properties": {
"code": {
"type": "string",
"description": "Der auszuführende Python-Code",
},
},
"required": ["code"],
},
},
},
]
```
{% endcode %}
Dann verwenden wir die folgenden Funktionen (kopieren, einfügen und ausführen), die die Funktionsaufrufe automatisch parsen und für jedes Modell den OpenAI-Endpunkt aufrufen:
{% code overflow="wrap" expandable="true" %}
```python
from openai import OpenAI
def unsloth_inference(
messages,
temperature = 0,7,
top_p = 1.0,
top_k = -1,
repetition_penalty = 0.0,
):
messages = messages.copy()
openai_client = OpenAI(
base_url = "http://127.0.0.1:8001/v1",
api_key = "sk-no-key-required",
)
model_name = next(iter(openai_client.models.list())).id
print(f"Verwendetes Modell = {model_name}")
has_tool_calls = True
original_messages_len = len(messages)
while has_tool_calls:
print(f"Aktuelle Nachrichten = {messages}")
response = openai_client.chat.completions.create(
model = model_name,
messages = messages,
temperature = temperature,
top_p = top_p,
tools = tools if tools else None,
tool_choice = "auto" if tools else None,
extra_body = {"top_k": top_k, "min_p": min_p, "dry_multiplier" :repetition_penalty,}
)
tool_calls = response.choices[0].message.tool_calls or []
content = response.choices[0].message.content or ""
tool_calls_dict = [tc.to_dict() for tc in tool_calls] if tool_calls else tool_calls
messages.append({"role": "assistant", "tool_calls": tool_calls_dict, "content": content,})
for tool_call in tool_calls:
fx, args, _id = tool_call.function.name, tool_call.function.arguments, tool_call.id
out = MAP_FN[fx](**json.loads(args))
messages.append({"role": "tool", "tool_call_id": _id, "name": fx, "content": str(out),})
else:
has_tool_calls = False
return messages
```
{% endcode %}
Nach dem Start von GLM-4.7-Flash über `llama-server` wie in [#deploy-with-llama-server-and-openais-completion-library](#deploy-with-llama-server-and-openais-completion-library "mention") oder siehe [Tool Calling Guide](/docs/de/grundlagen/tool-calling-guide-for-local-llms.md) für weitere Details können wir dann einige Tool-Aufrufe durchführen:
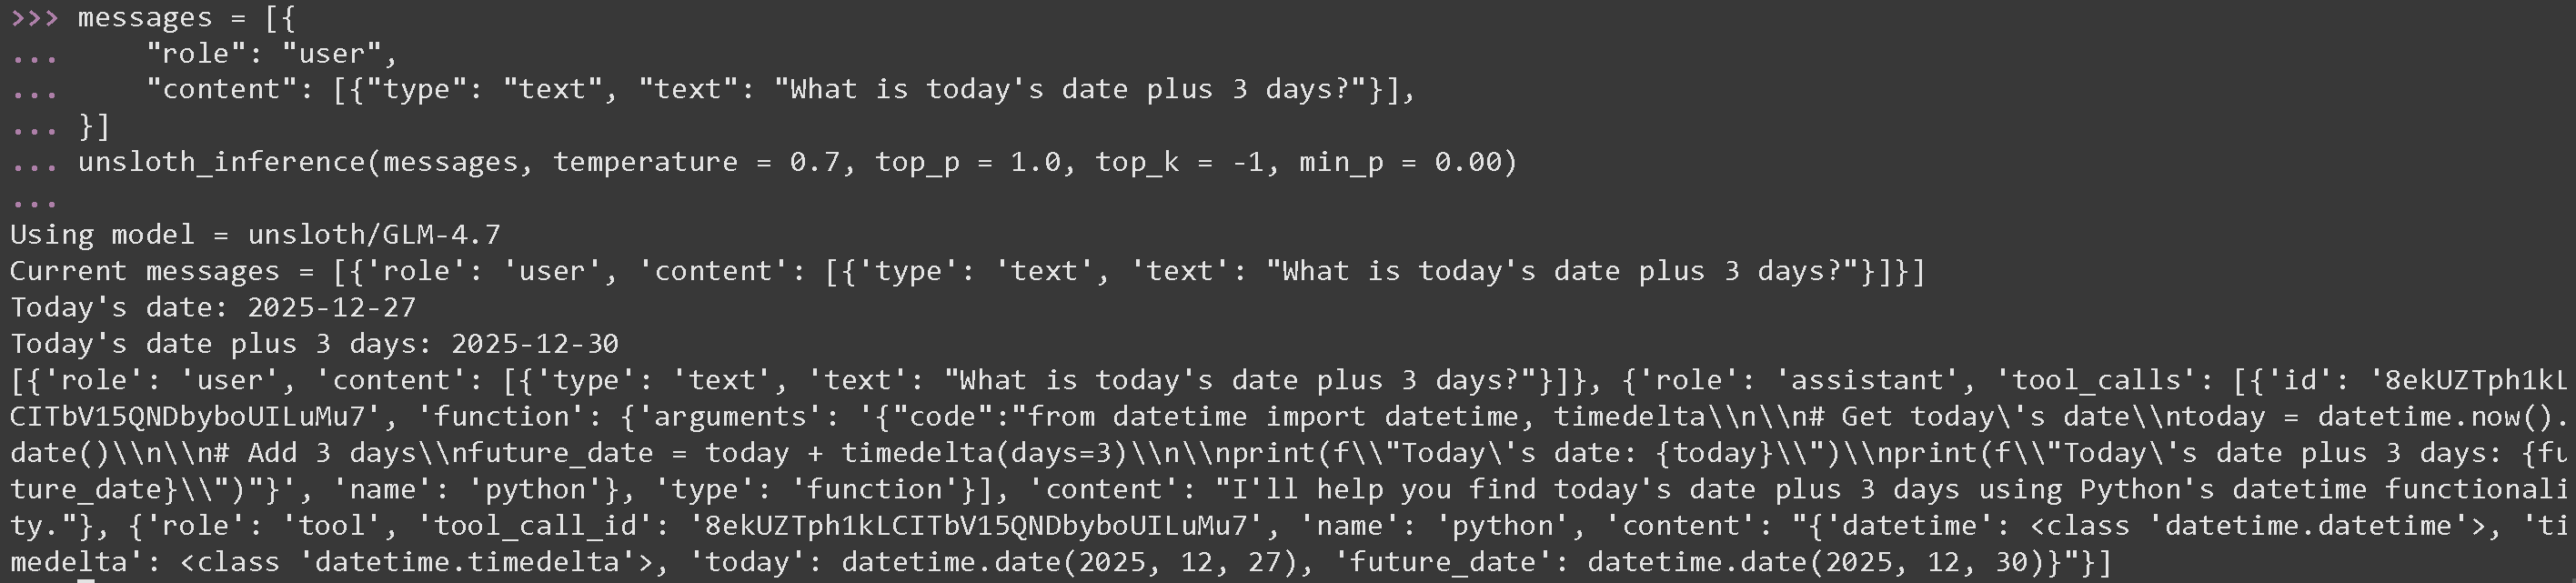
**Tool-Aufruf für mathematische Operationen für GLM 4.7**
{% code overflow="wrap" %}
```python
messages = [{
"role": "user",
"content": [{"type": "text", "text": "Was ist das heutige Datum plus 3 Tage?"}],
}]
unsloth_inference(messages, temperature = 1.0, top_p = 0.95, top_k = -1, min_p = 0.01)
```
{% endcode %}
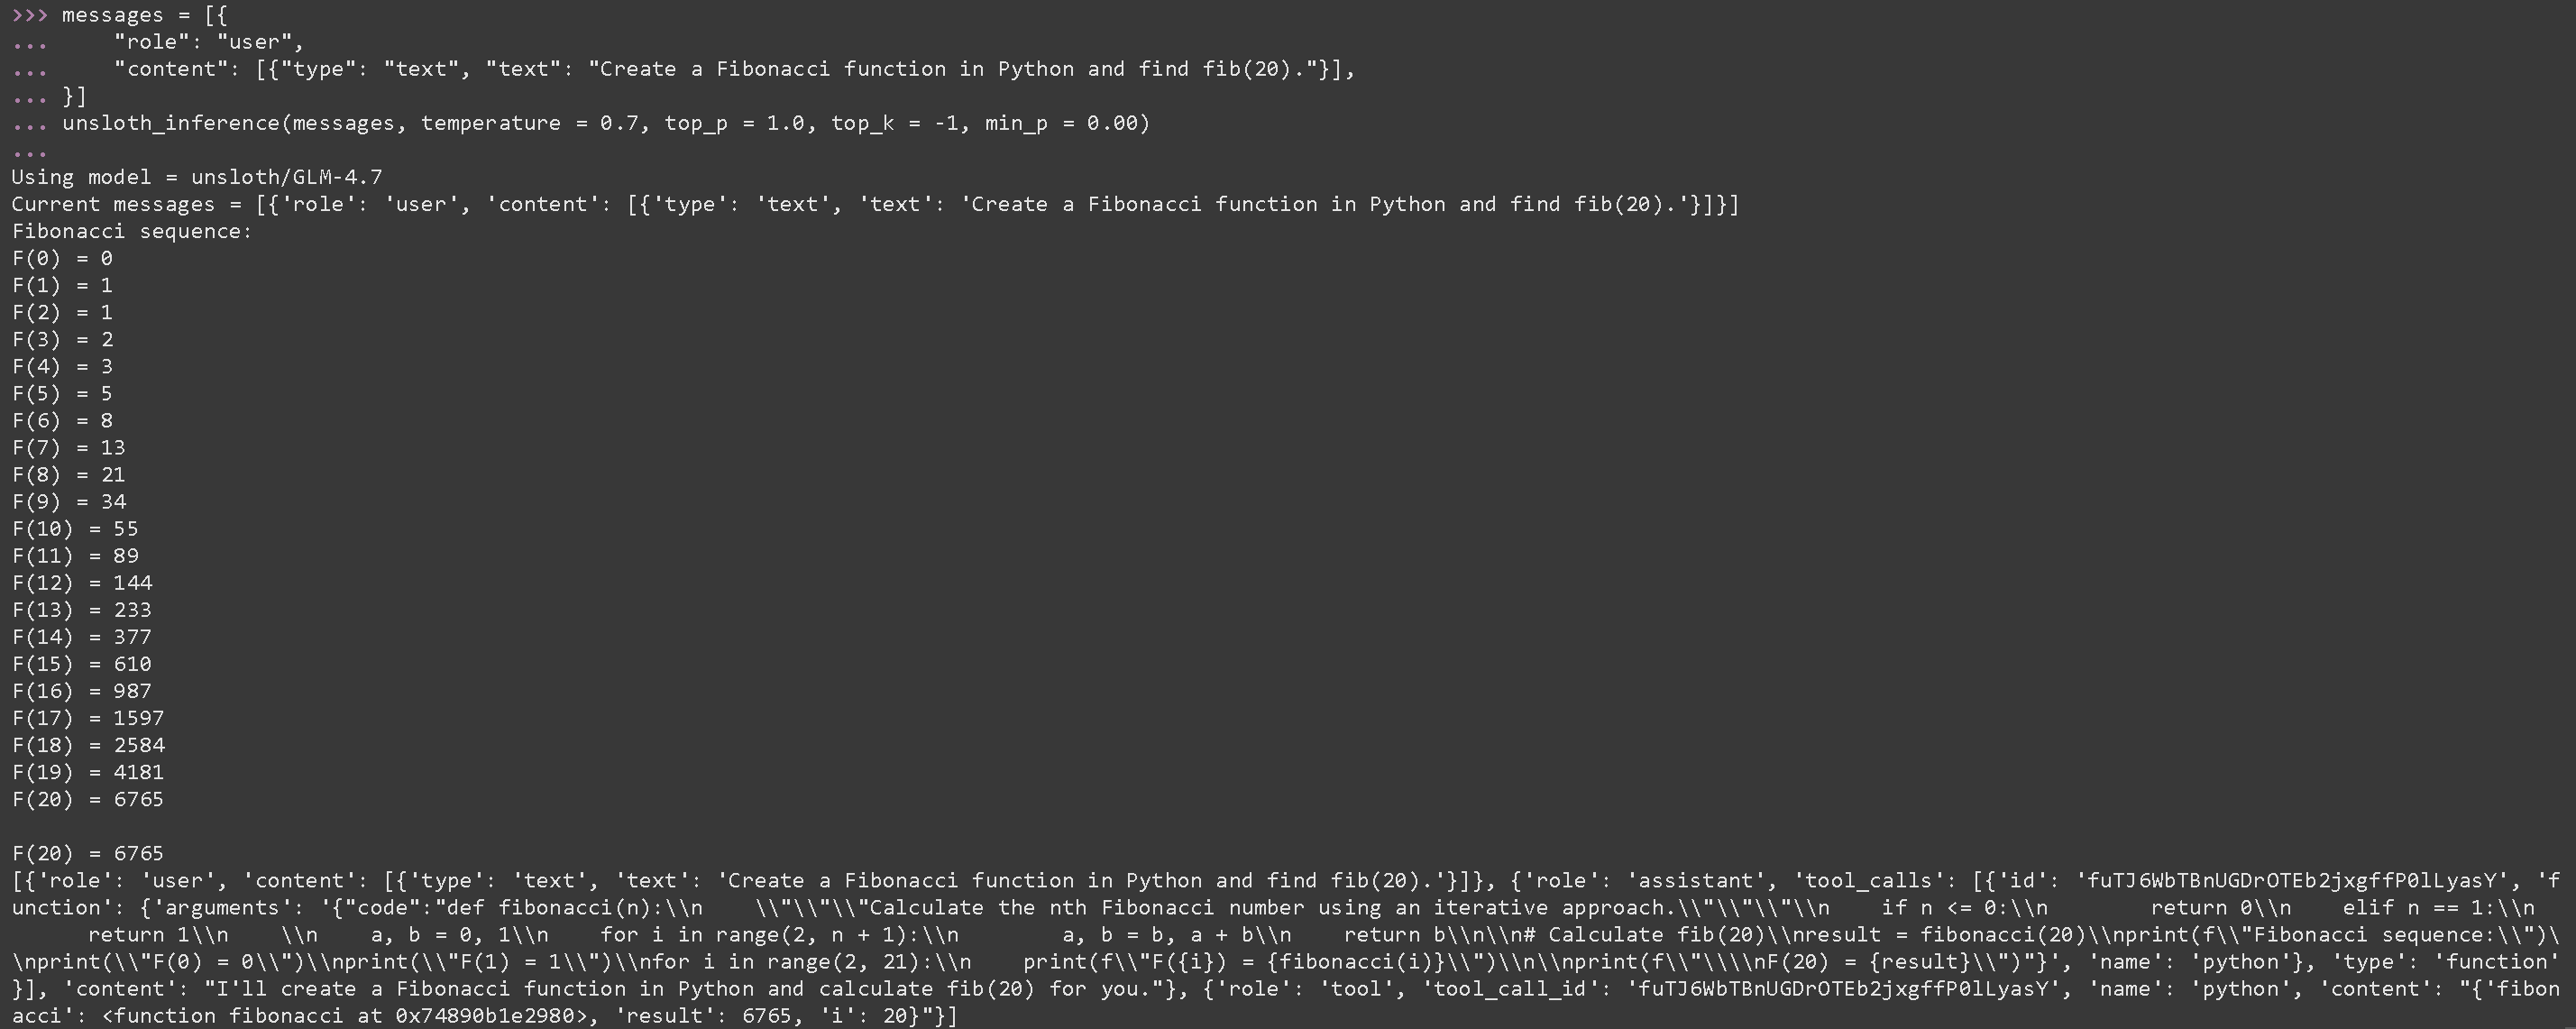
**Tool-Aufruf zum Ausführen des generierten Python-Codes für GLM-4.7-Flash**
{% code overflow="wrap" %}
```python
messages = [{
"role": "user",
"content": [{"type": "text", "text": "Erstelle eine Fibonacci-Funktion in Python und finde fib(20)."}],
}]
unsloth_inference(messages, temperature = 1.0, top_p = 0.95, top_k = -1, min_p = 0.01)
```
{% endcode %}
### Benchmarks
GLM-4.7-Flash ist das leistungsstärkste 30B-Modell über alle Benchmarks hinweg, außer AIME 25.
| Benchmark | GLM-4.7-Flash | Qwen3-30B-A3B-Thinking-2507 | GPT-OSS-20B |
| ------------------ | ------------- | --------------------------- | ----------- |
| AIME 25 | 91.6 | 85.0 | 91.7 |
| GPQA | 75.2 | 73.4 | 71.5 |
| LCB v6 | 64.0 | 66.0 | 61.0 |
| HLE | 14.4 | 9.8 | 10.9 |
| SWE-bench Verified | 59.2 | 22.0 | 34.0 |
| τ²-Bench | 79.5 | 49.0 | 47.7 |
| BrowseComp | 42.8 | 2.29 | 28.3 |
---
# Agent Instructions
This documentation is published with GitBook. GitBook is the documentation platform designed so that both humans and AI agents can read, navigate, and reason over technical content effectively. Learn more at gitbook.com.
## Querying This Documentation
If you need additional information that is not directly available in this page, you can query the documentation by asking a question.
Perform an HTTP GET request on the following URL with the `ask` and `goal` query parameters:
```
GET https://unsloth.ai/docs/de/modelle/tutorials/glm-4.7-flash.md?ask=&goal=
```
`ask` is the immediate question: it should be specific, self-contained, and written in natural language.
`goal` is what the user is ultimately trying to achieve, the reason they need the answer. Sharing it helps GitBook give you a better, more relevant answer. A goal is most helpful when it describes the outcome the user wants rather than restating the question. For example, with `ask=how do I create an API token`, a goal like `automate deployments from our CI pipeline` lets GitBook tailor the answer to that use case.
The response will contain a direct answer to the question and relevant excerpts and sources from the documentation.
Use this mechanism when the answer is not explicitly present in the current page, you need clarification or additional context, or you want to retrieve related documentation sections.